URL-Encoded Payload Exercise
This chapter walks step by step through obtaining an access token from Auth0 using the Client Credentials grant with a URL-encoded payload. After completing the steps you should have a working Web Service Connection that authenticates with Auth0 and is ready to call a protected Resource Server.
Prerequisites
- A free Auth0 developer account. See the Before Running the OAuth Tutorial chapter.
- A QIE version that supports OAuth 2.0 on Web Service Connections.
Step 1: Gather the Auth0 application details
Log in to your Auth0 Dashboard and open the Auth0 Management API (Test Application) application that was created in your tenant by default. Copy the following values from the Settings tab:
- Domain: for example,
dev-aejui4ki6aeosee.us.auth0.com. - Client ID
- Client Secret
The Auth0 token endpoint is the domain with /oauth/token appended. The audience for the Management API is https://<domain>/api/v2/.
Step 2: Construct the payload
In any text editor, build the URL-encoded payload from the values above. The shape of the payload is:
client_id=YOUR_CLIENT_ID&client_secret=YOUR_CLIENT_SECRET&audience=https://YOUR_AUTH0_DOMAIN/api/v2/&grant_type=client_credentials
Paste a slightly modified version of this into QIE in Step 4. Inside QIE the client ID and client secret are replaced with the node tags {ws-user:self} and {ws-pass:self} so the credentials live in the encrypted Username and Password fields rather than in the visible payload.
Step 3: Create the Web Service Connection
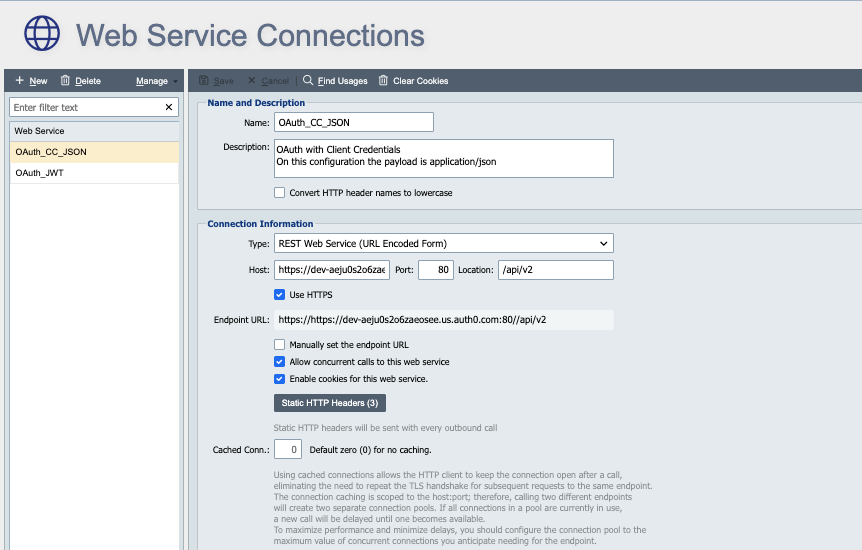
In QIE, navigate to the Web Service Connections page in the zone where you want to create the connection and click New.
Name and Description
Enter a Name and Description for the connection. The Name is how mapping nodes and destination nodes reference the connection. Generally, the Name is associated with the Resource Server (the FHIR server, registry, HIE, and so on), not with the Identity Provider.
Connection Information
Configure the Type, Host, Port, Location, and any other connection details that describe how to reach the Resource Server. For this exercise, set Type to REST Web Service (URL Encoded Form).
SSL
Configure the trust store and (if needed) client certificate that secures the connection to the Resource Server.
Note
The Name and Description, Connection Information, and SSL fields are not the Identity Provider's settings. They describe the Resource Server you are connecting to. This could be a FHIR server, state registry, HIE, or some other protected resource.
Step 4: Configure the Authentication Protocol
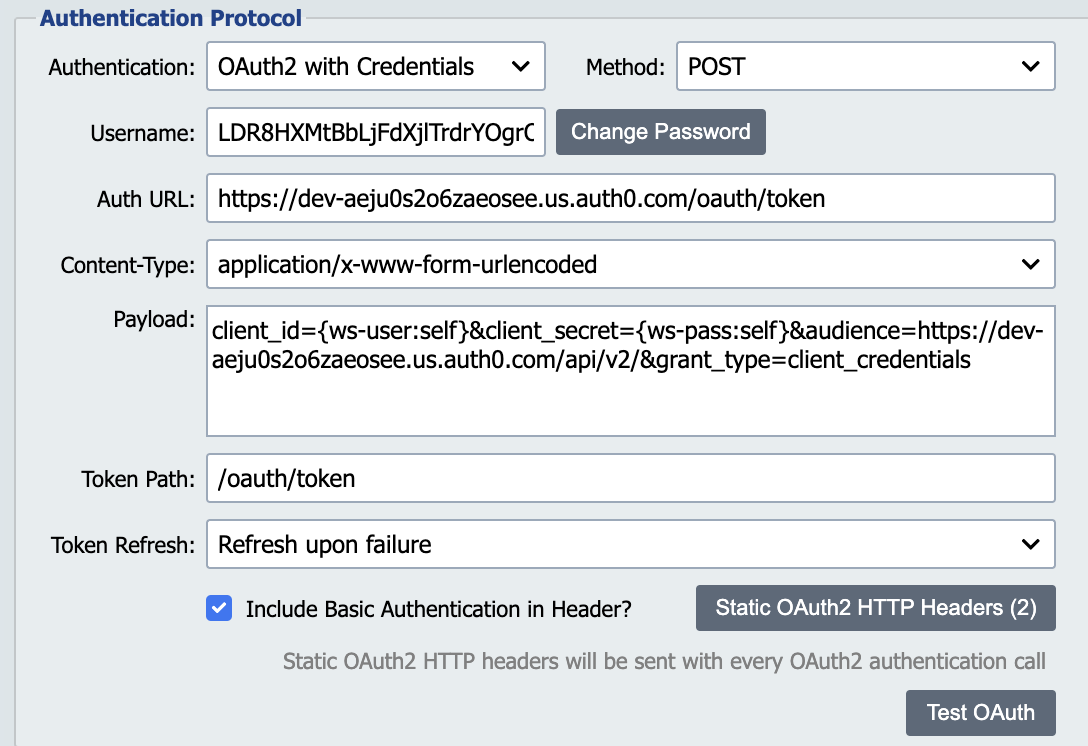
In the Authentication Protocol section, configure the following fields:
- Authentication:
OAuth2 with Credentials. - Method:
POST. - Username: the Auth0 Client ID from Step 1.
- Password: the Auth0 Client Secret from Step 1.
- Auth URL: the Auth0 token endpoint, for example:
- Content-Type:
application/x-www-form-urlencoded. - Payload: the URL-encoded payload, with
{ws-user:self}and{ws-pass:self}in place of the literal client ID and client secret: Replace the audience host with your own Auth0 domain. - Token Path:
/access_token. Auth0 returns the access token in theaccess_tokenfield of the response; this JSON pointer is how QIE finds it. - Token Refresh:
Refresh upon failure.
Step 5: Test the connection
Click Save to persist the Web Service Connection.
Click Test OAuth. QIE posts the payload to the Auth URL and displays the response in the Test Log dialog. A successful response includes a JWT in the access_token field.
If the test fails, verify the Client ID, Client Secret, Auth URL, and audience against the values on the Auth0 application's Settings page.
Step 6: Use the access token
QIE stores the access token in a cookie associated with the Web Service Connection and automatically sends it as Authorization: Bearer <token> in the HTTP header on every subsequent call to the Resource Server made through a mapping node or destination node that references this connection.
For example, a request issued through this connection now carries a header similar to: