Before Running the OAuth Tutorial
Before you start the OAuth tutorial, please make sure that you have completed the following:
Note
This tutorial assumes that the QIE server has been installed and configured and that you have been given a QIE username and password with privileges to create and modify Web Service Connections. Please refer to the QIE Install Guide for instructions on how to complete these steps if they have not already been completed.
Complete the QIE Tutorial First
This tutorial assumes you are familiar with the QIE console, channels, mapping nodes, and the zone-level Resources pages. If you have not yet completed the QIE Tutorial, do that first. The OAuth tutorial builds on the same concepts.
Create a Free Auth0 Developer Account
Every hands-on exercise in this tutorial uses Auth0 as the Identity Provider. Sign up for a free developer account at auth0.com and log in to the Auth0 Dashboard at least once before you start the exercises. A default application named Auth0 Management API (Test Application) is created in your tenant automatically; the URL-Encoded and JSON exercises use that application.
Auth0 free tier
As of this writing (May 2026), Auth0's free developer plan keeps a new tenant active for 30 days, after which the tenant is suspended unless you upgrade. Plan to complete the OAuth exercises within that window, or check auth0.com/pricing for the current terms before signing up.
Make a note of the following values from the application's Settings page. Paste them into QIE later:
- Domain: for example,
dev-aejui4ki6aeosee.us.auth0.com. - Client ID: the public identifier for the application.
- Client Secret: the confidential credential for the application. Treat it like a password.
Have a Signing Certificate Available for the JWT Exercise
The JWT Payload Exercise signs the JWT with the private key of an RSA certificate stored in QIE's Certificate Management page. A self-signed certificate is sufficient for this tutorial. Auth0 accepts a self-signed public key for Private Key JWT authentication. Production deployments with other Identity Providers may require a CA-signed certificate depending on the provider's policy.
If you do not already have an RSA key pair uploaded for this purpose, create one through Certificate Management before starting the JWT chapter:
- In QIE, open Resources -> Certificate Management and generate a new Private Key (RSA, 2048 bits or larger).
- With that key selected, click New -> Self-Signed Certificate and fill in the Name, Description, and validity period. See Generating Certificate Signing Request (CSR) or Self-Signed Certificate for the field-by-field reference.
- Export the public certificate (not the private key). You upload it to the Auth0 application's Credentials tab in Step 1 of the JWT exercise.
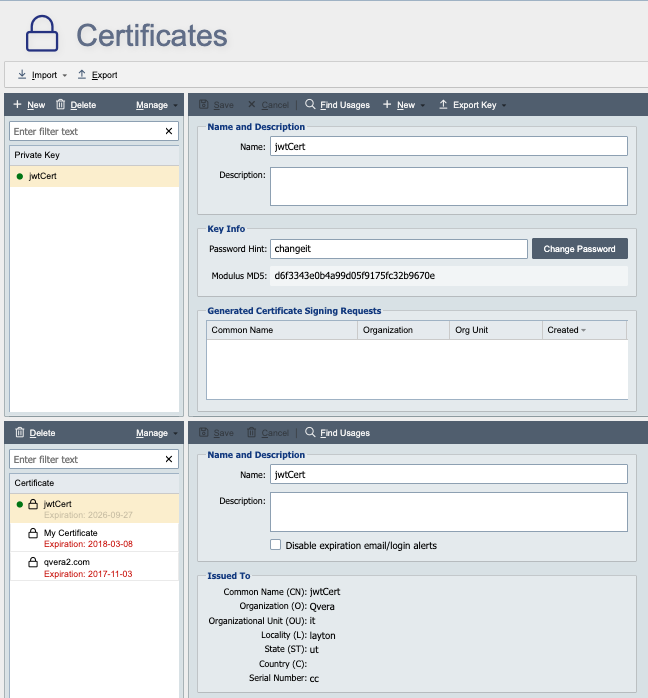
When the key and its self-signed certificate are both listed on the Certificate Management page, you are ready to move on:
Two Auth0 applications make life easier
Each Auth0 application can use only one authentication method at a time. This tutorial uses two methods, so the smoothest path is to create two applications in your Auth0 tenant:
| Exercise | Auth0 application | Authentication method |
|---|---|---|
| URL-Encoded | Auth0 Management API (Test Application) (default) |
Client Secret |
| JSON | Auth0 Management API (Test Application) (default) |
Client Secret |
| JWT | A new application you create (any name) | Private Key JWT |
You do not have to create the second application now. The JWT exercise walks you through it. Just do not reconfigure the default application's authentication method, or the first two exercises stop working.