Elastic Container Services (ECS)
Wow!! The remaining pieces are now in place. All the services and resources needed to launch the container in ECS now exist. It has taken a while, but I can taste the goodness already.
Create ECS Cluster
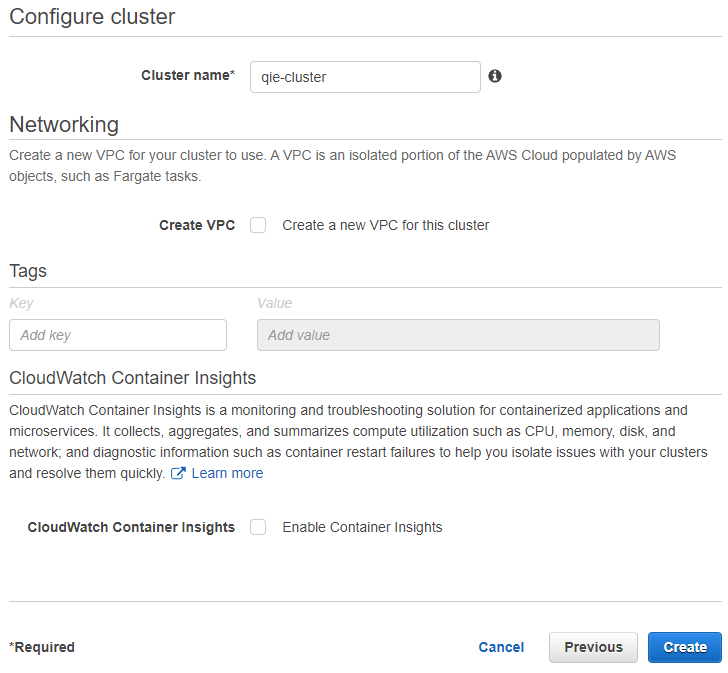
From the ECS management page, select the 'Clusters' menu option on the left menu. Click on 'Create Cluster'. The environment only needs networking, so select 'Networking only' as the template. Click on 'Next step' at the bottom of the page.
Give the cluster a name, I used 'qie-ecs-cluster' for this example, but you can use any name you would like. Click on 'Create' at the bottom of the page.
Create Task Definition
From the ECS management page, select the 'Task Definitions' menu option on the left menu. Click on 'Create new Task Definition'.
Click on 'Fargate' and then click on 'Next step' at the bottom of the page.
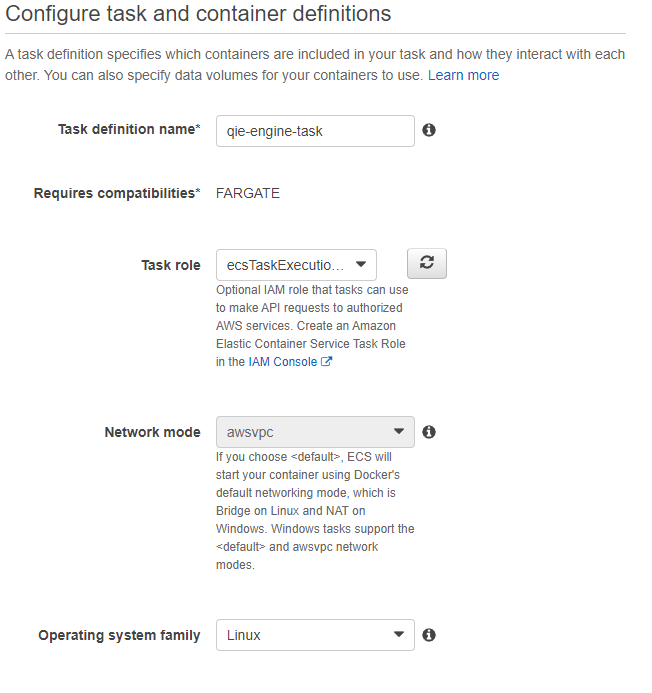
Give the task a name like 'qie-ecs-task', then select 'ecsTaskExecutionRole' from the 'Task role' drop-down.
Select 'Linux' from the 'Operating system family'.
In the 'Task size' section, define how much memory each container needs, and how many vCPU units each container needs. Each QIE container is configured to use most of this memory, though the amount differs based on your anticipated needs. This guide uses '2GB' of memory and '1 vCPU'.
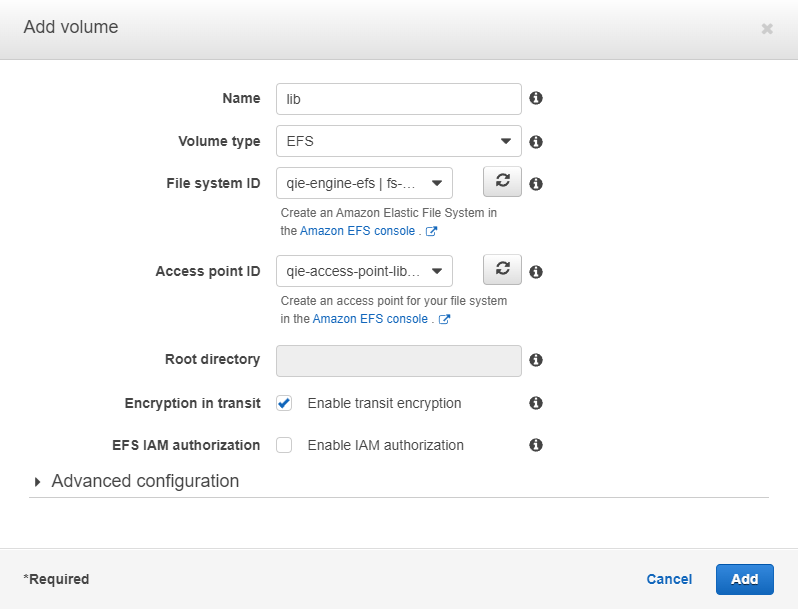
Before defining the container, scroll down to the bottom of the page to the 'Volumes' section. Click on 'Add volume'. Name the first volume 'lib' and change the volume type to 'EFS'. Select 'qie-ecs-efs' from the 'File system ID' drop down. Now select the 'qie-ecs-ap-lib' from the 'Access point ID' field. Finally, check the 'Encrypt in transit' checkbox. Click on 'Add' at the bottom of the dialog.
Repeat the above steps above to create a second volume for the jdbcDriver. Click on 'Add volume'. Name the second volume 'jdbcDriver' and change the type to 'EFS'. Select 'qie-ecs-efs' from the 'File system ID' drop down. Select the 'qie-ecs-ap-jdbcDriver' from the 'Access point ID' field. Click on 'Encrypt in transit' checkbox, and finally 'Add'.
Now scroll up to the 'Container definitions' and click on 'Add container'. The container name is 'qie' and the image comes from the docker hub page found here https://hub.docker.com/r/qvera/qie this example uses 'qvera/qie:5.0.50' as the image. Change the memory limits to match the task size. Since my task is 2GB, I am giving the container a hard limit of 2048.
The port mappings must be updated as new ports are opened to listen for messages on interfaces. Edit your task definition and add ports here as needed. Open port '80' for the console port and port '8080' for the probe port. If you have opened the secure listener port '8443', open it in the container also.
Note
When opening new listening ports after everything is configured, you must create a new task revision, and add any new ports to the container mapping here.
Scroll down to the 'Environment' section and the environment variables are at the bottom of this section. The following variables must be added:
| Key Name | Type | Value |
|---|---|---|
| JAVA_OPTIONS | Value | -Xmx1950m (This is almost all the memory allocated to the container in the hard limit. Do not set it to the full amount allocated to the container, as the rest of the container needs some memory to function correctly. Change this as needed based on your configuration.) |
| QIE_HAENGINE | Value | EnterpriseHAServiceImpl |
| CONNECTION_DRIVER | Value | com.mysql.cj.jdbc.Driver |
| CONNECTION_URL | Value | jdbc:mysql://{database_endpoint}:{port}/qie (The database_endpoint is found on the RDS management console when you select your database). |
| CONNECTION_USERNAME | ValueFrom | {Secret_ARN}:{secret_key}:: (The secret ARN is found on the Secrets Manager console page, then select the secret). |
| CONNECTION_PASSWORD | ValueFrom | {Secret_ARN}:{secret_key}:: (The secret ARN is found on the Secrets Manager console page, then select the secret). |
| HIBERNATE_DIALECT | Value | com.qvera.qie.persistence.MySQL57UnicodeDialect |
| QIE_PROBEPORT | Value | 8080 |
Scroll down to the 'Storage and Logging' section to add the volume mounts. Mount two volumes, one to the /java/qie/lib directory and the other to the /java/qie/jdbcDriver directory.
Select 'lib' from the source drop down, and then input '/java/qie/lib' as the container path.
Click 'Add mount point' and then select 'jdbcDriver' from the source drop down, and then input '/java/qie/jdbcDriver' as the container path.
Click on 'Add' at the bottom of the container definition, then click on 'Create' at the bottom of the task definition page.
Test Task Definition
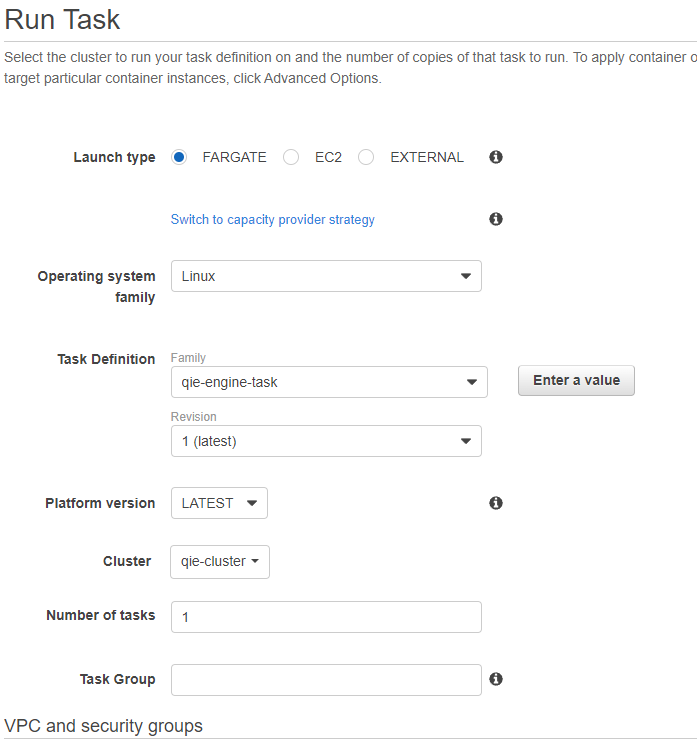
With the task defined, test it to make sure everything is configured correctly. Go back to the 'Cluster' menu option on the left of the page and select the 'qie-ecs-cluster'. Select the 'Task' tab, then click on 'Run new task'.
Select 'Fargate' as the run type, and 'Linux' as the operating system family.
Select 'qie-ecs-vpc' as the 'Cluster VPC' and the 'us-east-1a' as the subnets. Edit the 'Security groups' and change the option to 'Select existing security group' then select the default security group. Click on 'Save' at the bottom of the 'Configure security groups' page.
'Auto assign public IP' needs to be 'Enabled', then click on 'Run Task' at the bottom of the page.
Select the task ID from the 'Task' tab, and you can see the task detail. You can review the logs from here from the 'Logs' tab.
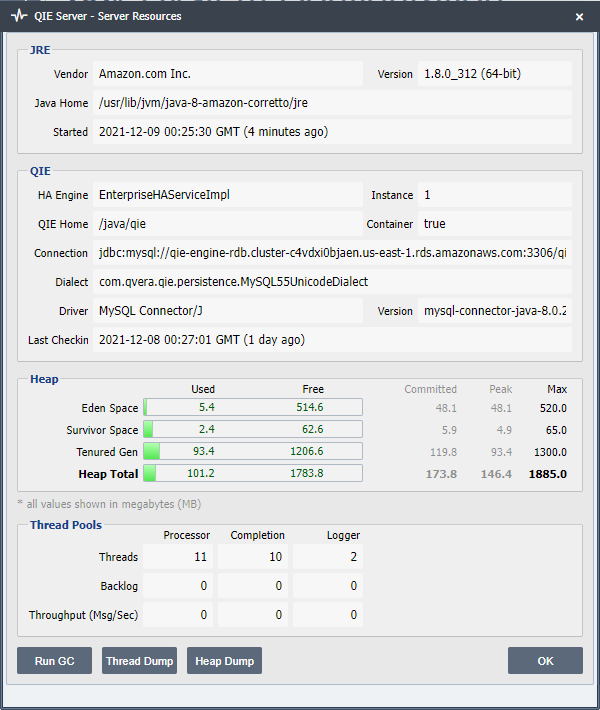
Copy the public address and browse to it on port 80, once you can log in, set your new admin password, and cancel out of the license dialog. Navigate to the Help -> Monitor Server Resources dialog to verify that QIE is running against the MySQL database and is running the 'EnterpriseHAServiceImpl' engine.
The last thing to check is that the vtd library was also attached to the service. Check this by navigation to the System Administration -> System Configuration page. Scroll down to the 'External Libraries' section and click on 'Manage External Libraries' you should see the VTD and any other jars that were placed in the EFS listed on this dialog.
With the task verified, stop it from the 'Clusters' detail page. Select the 'Tasks' tab then select the running task and click on the 'Stop' button.
Define New Service
The last step of this process it to create a service that creates a cluster and scales up or down based on resource consumption.
Due to limitations in the AWS management console, this last step requires that the service be created using the AWS CLI tool. Information on installing and configuring this tool can be found here (https://docs.aws.amazon.com/cli/latest/userguide/cli-chap-welcome.html).
The AWS management console allows only one port to be added to the load balancer, and at a minimum the console port must be added to the load balancer using the management console prevents creating a service that allows the console port and a listening port for a QIE channel.
Once you have the CLI tool installed on your workstation, you can create a new service using the documentation found here (https://awscli.amazonaws.com/v2/documentation/api/latest/reference/ecs/create-service.html).
Create a new file on your workstation and name it qie-ecs-service.json. Then open the file with your preferred text editor and add the following lines:
{
   "serviceName": "qie-service",
   "taskDefinition": "qie-ecs-task",
   "launchType": "FARGATE",
   "loadBalancers": [
      {
         "targetGroupArn": "{find ARN on the target group in the EC2 management page}",
         "containerName": "qie",
         "containerPort": {
            port # corresponding to target group
         }
      },
      {
         "targetGroupArn": "{find ARN on the target group in the EC2 management page}",
         "containerName": "qie",
         "containerPort": {
            port # corresponding to target group
         }
      }
   ],
   "networkConfiguration": {
      "awsvpcConfiguration": {
         "subnets": [
            "{subnet ID found on the subnet from the VPC management page}"
         ],
         "securityGroups": [
            "{security group ID found on the security group in the EC2 management page}"
         ],
         "assignPublicIp": "ENABLED"
      }
   },
   "desiredCount": {
      # of nodes in the cluster
   }
}
An example output would be:
{
   "serviceName": "qie-service",
   "taskDefinition": "qie-ecs-task",
   "launchType": "FARGATE",
   "loadBalancers": [
      {
         "targetGroupArn": "arn:aws:elasticloadbalancing:us-east-1:526756781795:targetgroup/qie-console-target-80/d6e410e640da0965",
         "containerName": "qie",
         "containerPort": 80
      },
      {
         "targetGroupArn": "arn:aws:elasticloadbalancing:us-east-1:526756781795:targetgroup/qie-secure-8443/ba85e35d0f698158",
         "containerName": "qie",
         "containerPort": 8443
      }
   ],
   "networkConfiguration": {
      "awsvpcConfiguration": {
         "subnets": [
            "subnet-0638695a0d7cfce34"
         ],
         "securityGroups": [
            "sg-009eef8d8eff7ffef"
         ],
         "assignPublicIp": "ENABLED"
      }
   },
   "desiredCount": 2
}
Once you have the .json configuration file created and saved, open the AWS CLI and navigate to the folder container the .json file. Then execute the following command:
aws ecs create-service --cluster qie-ecs-cluster --service-name qie-service --cli-input-json file://qie-ecs-service.json
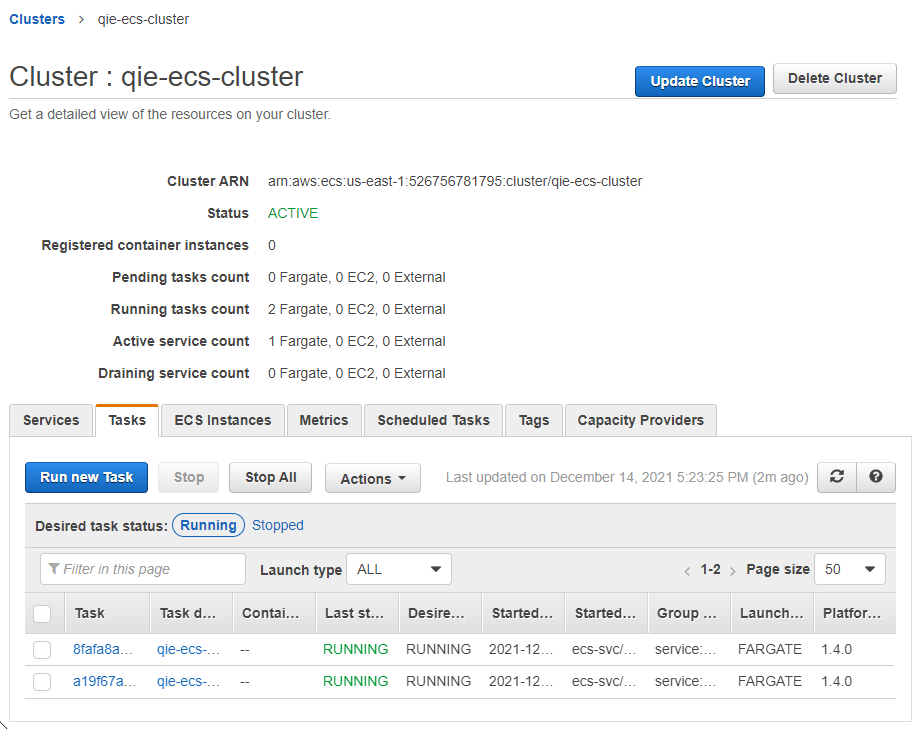
If you did not get any errors from this command, you should be able to navigate back to the Amazon ECS management page and select 'Clusters' from the left menu. Select the 'qie-ecs-cluster' to view the detail. The 'Services' tab should show your new service, and the 'Tasks' tab shows the number of containers running, if you set your 'desiredCount' option to 2, then two tasks are running.
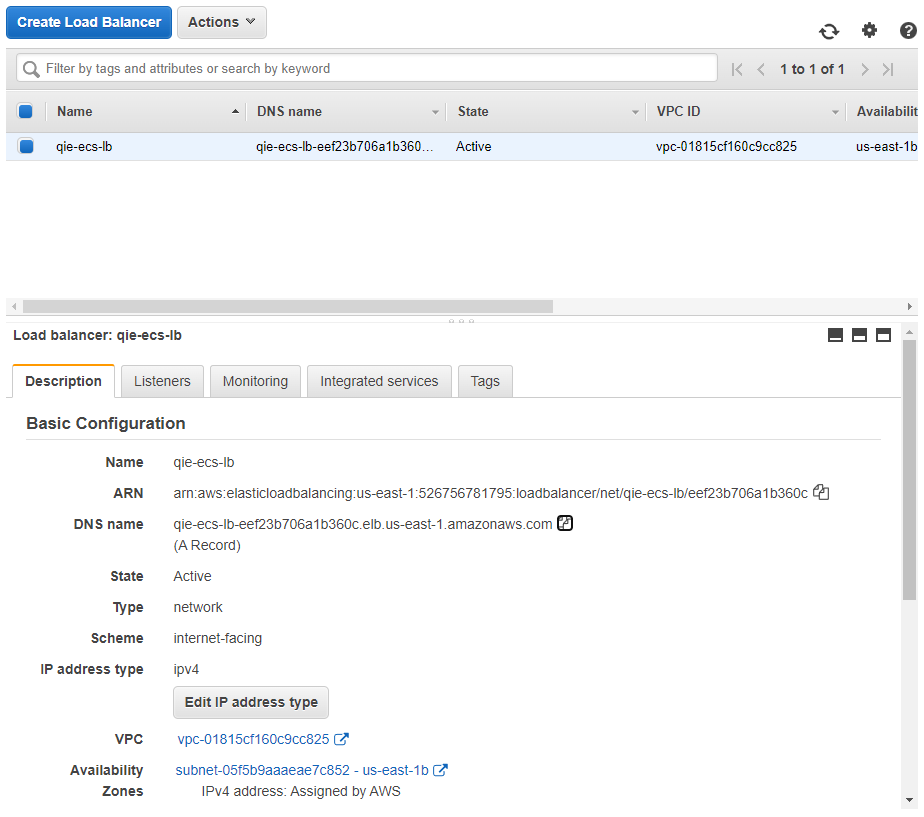
Now, get the FQDN from your load balancer by navigating back to the EC2 management page and selecting 'Load Balancers' from the menu on the left. Find the 'qie-ecs-lb' load balancer and select it. In the detail below, find the 'DNS name' and copy the value. Browse to this endpoint and you should get the QIE administration login.
Congratulations, you have successfully setup QIE to run in the Amazon ECS environment. You can now go make magic happen in your interfaces.