JWT Payload Exercise
This chapter walks step by step through obtaining an access token from Auth0 using a private-key-signed JWT-bearer assertion. Instead of sending a client secret on every token request, QIE constructs a short-lived JWT, signs it with an RSA private key, and exchanges it for an access token. The Identity Provider verifies the signature with the matching public key, which you register with the Identity Provider in advance.
Prerequisites
- A free Auth0 developer account. See the Before Running the OAuth Tutorial chapter.
- An RSA certificate stored in QIE's Certificate Management page, whose public key half is registered with the Auth0 application.
- A QIE version that supports OAuth 2.0 on Web Service Connections.
Note
Switching the Auth0 Management API (Test Application) to Private Key JWT authentication disables the Client Secret on that application. The previous two exercises no longer work against it. Create a new Auth0 application for the JWT exercise to keep the default application intact. For help setting up Auth0 for private-key JWT, see Auth0's documentation:
Explanation of JWT Fields
The Token Config field on the connection is a JSON document with two members, header and body. The keys QIE recognizes are:
Header
| Claim | Required | Description |
|---|---|---|
typ |
Yes | Token type; set to JWT. |
alg |
Yes | Signing algorithm (RS256, RSA signature with SHA-256). The header alg and the certificate algorithm must match. |
kid |
Usually | Key ID, identifying the public key the Identity Provider should use to verify the signature. Typically the SHA-1 thumbprint of the public certificate. Obtain this value from the Identity Provider when you register the certificate. |
x5t |
Optional | SHA-1 thumbprint of the X.509 certificate associated with the signing key (no spaces). Adds an additional check but is not strictly required. Obtain this value from the Identity Provider if used. |
Body (claims)
| Claim | Required | Description |
|---|---|---|
iss |
Yes | Issuer of the JWT. For Auth0, the application's Client ID. |
sub |
Yes | Subject of the token, usually the same as iss for machine-to-machine flows. |
aud |
Yes | Intended audience, the Identity Provider's token endpoint URL. |
exp |
Optional | Expiration in seconds (for example, 300). Identity Providers typically reject expirations longer than 5 minutes. Leave the value as "(Set by JWT)" to have QIE populate it automatically at runtime, or omit the field entirely to accept QIE's default. |
nbf |
Optional | "Not before" time, when the token becomes valid. Leave as "(Set by JWT)" to have QIE populate it automatically at runtime. |
iat |
Optional | Issued-at time. Leave as "(Set by JWT)" to have QIE populate it automatically at runtime. |
jti |
Yes | Unique JWT identifier to prevent replay attacks. The default value /*{UUID}*/ is replaced with a fresh UUID for every token request. |
Any claim left as "(Set by JWT)" is filled in by QIE when the JWT is signed. The Token Config editor in the Web Service Connection dialog explains this directly below the editor: "Items marked as 'Set by JWT' is set automatically when the Java Web Token (JWT) is created. Nonstandard attributes can be added manually to the configuration, standard attributes can be removed if not needed in the JWT."
Step 1: Create the Auth0 Application
In your Auth0 Dashboard, create the application you intend to use for this exercise and switch its authentication method to Private Key JWT. Upload the public-key half of the RSA key pair stored in QIE's Certificate Management page.
Note
Auth0 accepts the self-signed public certificate generated in Before Running the OAuth Tutorial as-is. No CA chain is required. Private Key JWT verification only needs the public key to match the private key QIE uses to sign the assertion.
Make a note of the application's Client ID and the tenant Domain.
Step 2: Create the Web Service Connection
In QIE, navigate to the Web Service Connections page and click New.
Name and Description
Enter a Name and Description for the connection. The Name is how mapping nodes and destination nodes reference the connection. Generally, the Name is associated with the Resource Server, not with the Identity Provider.
Connection Information
Configure the Type, Host, Port, Location, and any other connection details that describe how to reach the Resource Server. For this exercise, set Type to REST Web Service (Encoded Content).
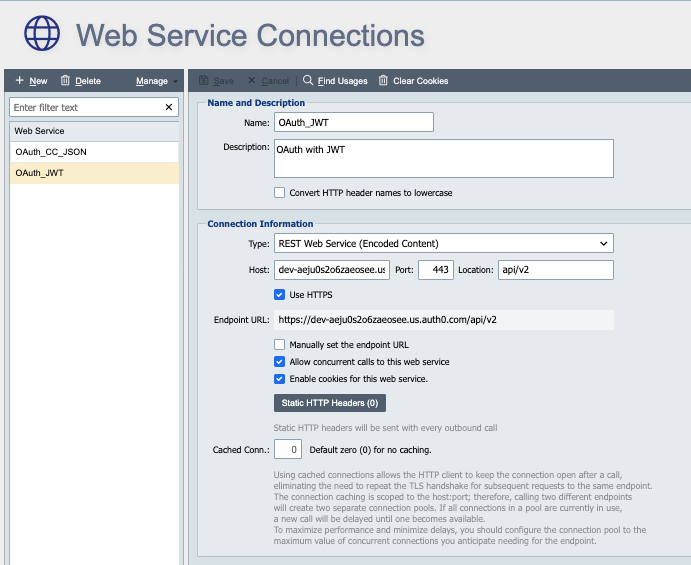
SSL
Configure the trust store and (if needed) client certificate that secures the connection to the Resource Server.
Note
The Name and Description, Connection Information, and SSL fields are not the Identity Provider's settings. They describe the Resource Server you are connecting to. This could be a FHIR server, state registry, HIE, or some other protected resource.
Step 3: Select the JWT Authentication Protocol
In the Authentication field, select OAuth2 with JWT. QIE replaces the credential-based fields with the JWT-specific fields (Token Config, Token Server, Token Content) and adds a slot for the signing certificate.
Select the RSA certificate whose public key you registered with Auth0 in Step 1. QIE uses the certificate's private key to sign the JWT.
Step 4: Configure the Token Config
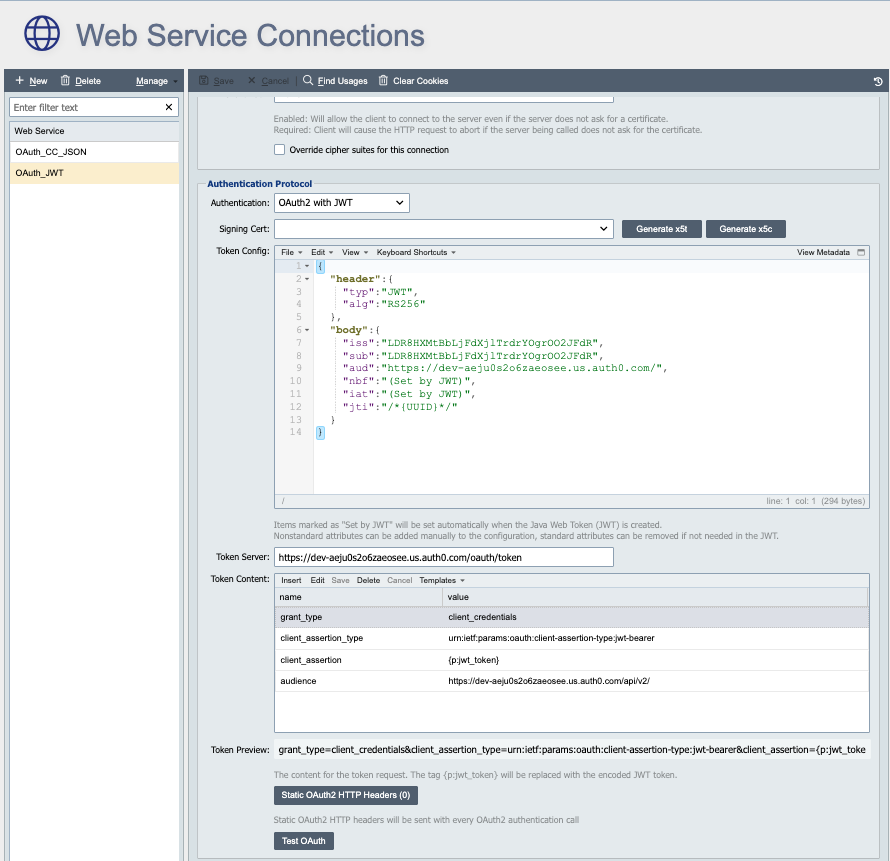
The Token Config field is pre-populated with a template that includes every claim QIE recognizes, with placeholder values. Replace the placeholders with the claims for your Auth0 application. For the Auth0 Management API the minimal configuration is:
{
  "header": {
    "typ": "JWT",
    "alg": "RS256"
  },
  "body": {
    "iss": "YOUR_AUTH0_CLIENT_ID",
    "sub": "YOUR_AUTH0_CLIENT_ID",
    "aud": "https://YOUR_AUTH0_DOMAIN/",
    "nbf": "(Set by JWT)",
    "iat": "(Set by JWT)",
    "jti": "/*{UUID}*/"
  }
}
Substitute your own values:
issandsubare the Auth0 Client ID of the application.audis your Auth0 domain with a trailing slash.
Leave nbf and iat as "(Set by JWT)" so QIE stamps the appropriate timestamps when it signs the JWT. The default /*{UUID}*/ value on jti produces a fresh UUID on every token request.
Note
kid and x5t are required only when the Identity Provider needs them to locate the verifying key. Auth0 identifies the key by the certificate you registered in Step 1, so both can be omitted.
Step 5: Specify the Token Server
In the Token Server field, enter the Auth0 token endpoint:
Replace YOUR_AUTH0_DOMAIN with your tenant domain.
Step 6: Specify the Token Content
The Token Content field is the body of the POST that QIE sends to the Token Server. The tag {p:jwt_token} is replaced at runtime with the signed JWT.
For Auth0, set Token Content to:
grant_type=client_credentials&client_assertion_type=urn:ietf:params:oauth:client-assertion-type:jwt-bearer&client_assertion={p:jwt_token}&audience=https://YOUR_AUTH0_DOMAIN/api/v2/
Replace YOUR_AUTH0_DOMAIN with your tenant domain.
Note
For other Identity Providers, start with the default Token Content shown in the field. If that does not work, consult the provider's documentation for the correct grant type, assertion type, and audience.
Step 7: Test the Connection
Click Save to persist the Web Service Connection.
Click Test OAuth. QIE constructs the JWT from the Token Config, signs it with the selected certificate, sends it to the Token Server as the client_assertion parameter, and displays the response in the Test Log dialog. A successful response includes the access token Auth0 issued.
If the test fails, verify:
issandsubmatch the Auth0 Client ID.audmatches the Auth0 domain.- The signing certificate corresponds to the public key registered with the Auth0 application.
algmatches the certificate's algorithm (RS256for an RSA certificate).
Step 8: Use the Access Token
QIE stores the access token in a cookie associated with the Web Service Connection and automatically sends it as Authorization: Bearer <token> in the HTTP header on every subsequent call to the Resource Server made through a mapping node or destination node that references this connection.
Conclusion
This tutorial covered the three OAuth 2.0 payload styles QIE supports (URL-encoded Client Credentials, JSON Client Credentials, and JWT-bearer assertion) and the field-level configuration that drives each one. You should now be able to add OAuth-protected Resource Servers to a QIE channel with confidence.