Importing and Exporting Configurations
QIE has the ability to export configurations that can then be imported to other QIE instances. This feature makes moving QIE configurations between different environments easy and reliable. Non-administrator users can only import and export zones for which they have Edit Permissions.
Export Configuration Dialog
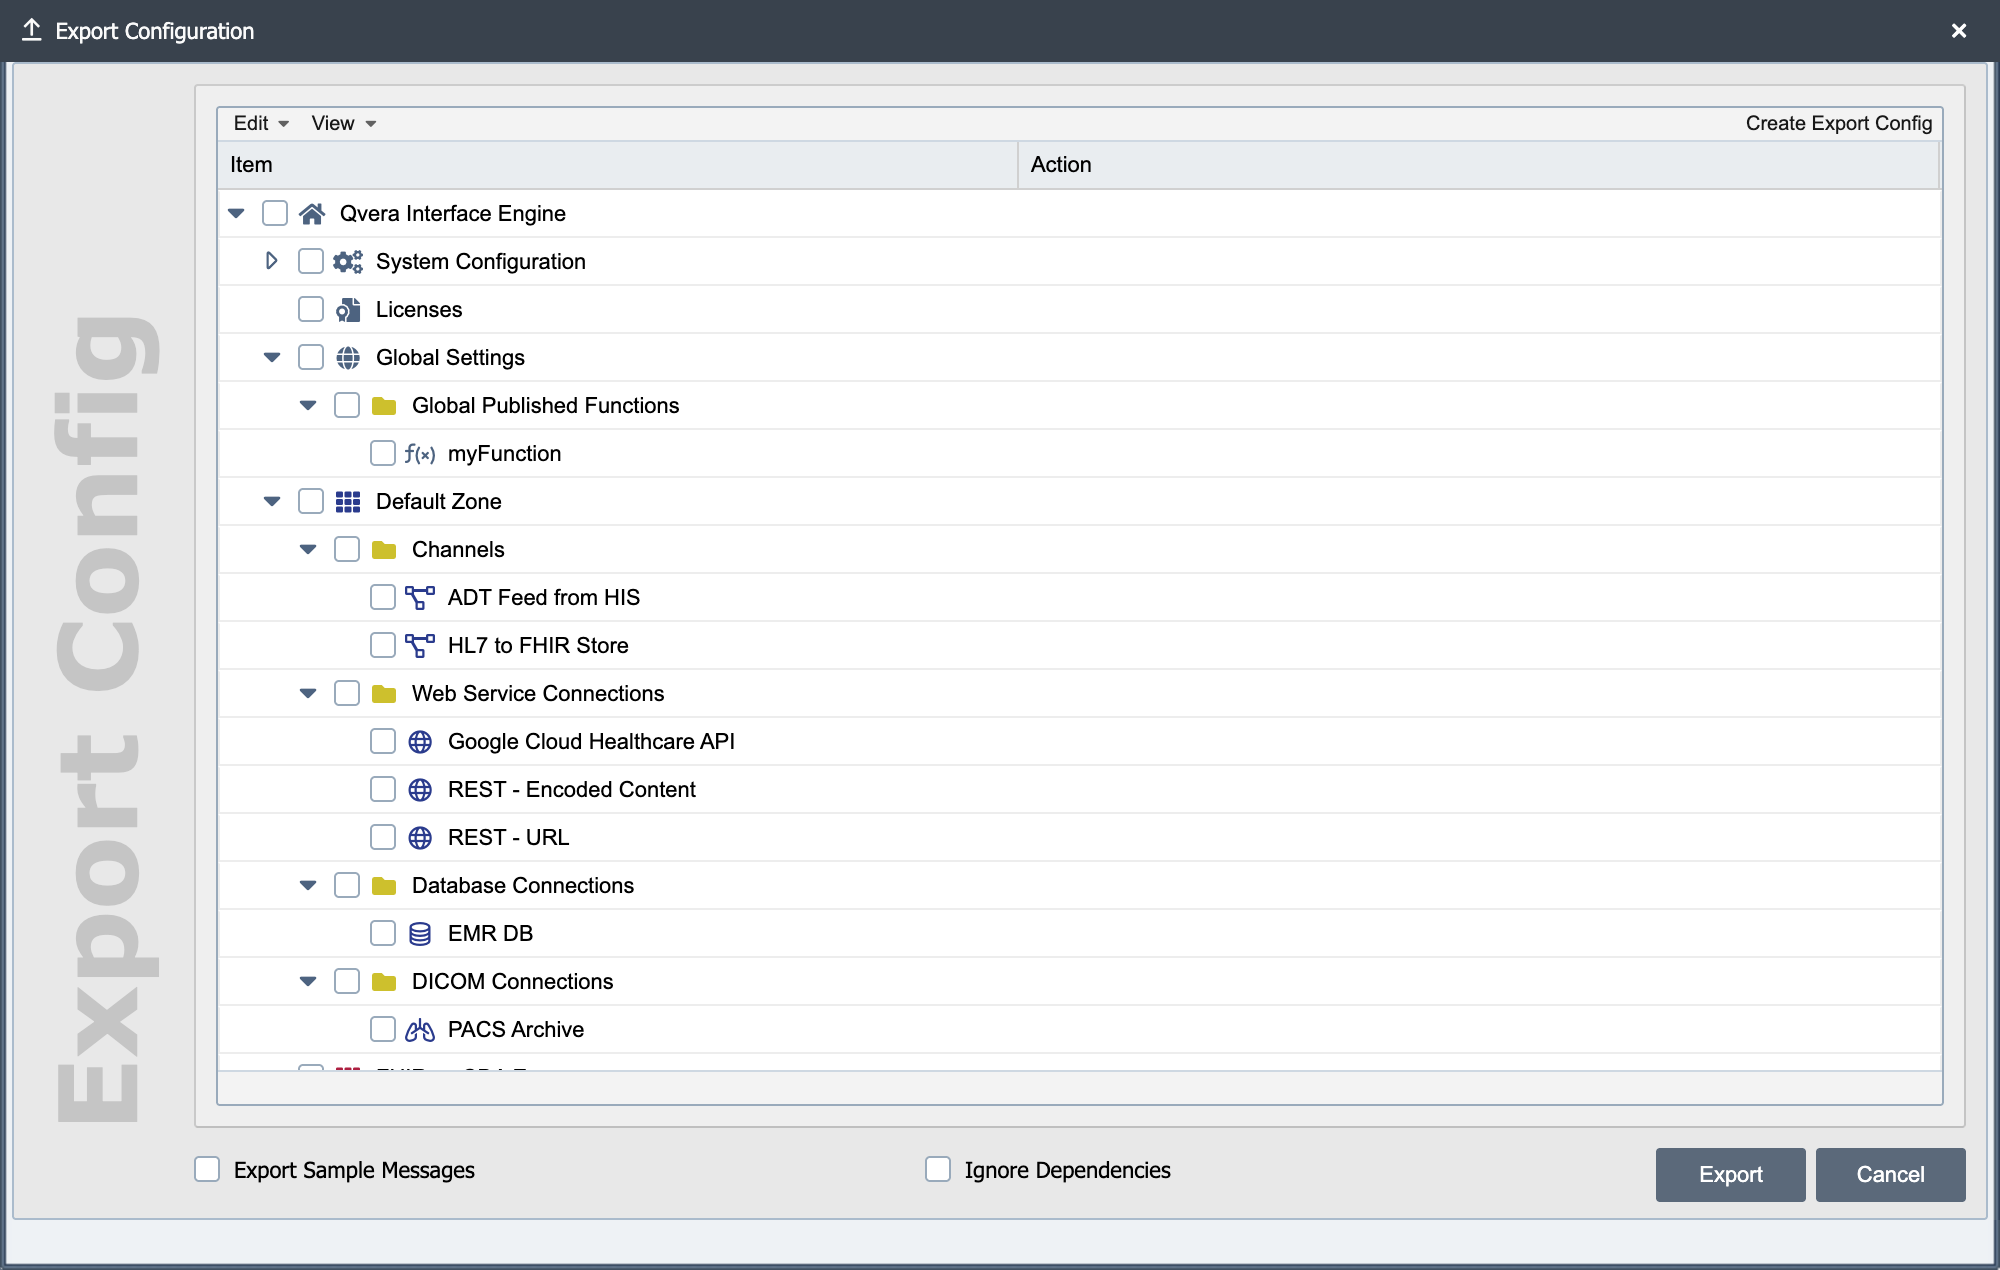
The Export Configuration Dialog is accessed by selecting Application -> Export Configuration from the main menu.
Item Selection
From this dialog, a user can select the items to export. Selecting the root node (labeled Qvera Interface Engine) selects all configuration information across all Zones.
Dependency Selection
When exporting a specific channel configuration it is important to select all of the items related to that channel (e.g. System Variables, Database Connections, Web-Service Connections, Published Mappings, Published Functions, and HTML Forms). QIE attempts to auto select the dependencies associated with the channel configuration. Careful consideration should still be given to ensure that all of the dependencies for the given channel are selected, so the export contains every item related to the channel.
When you select an item that has unselected dependencies, QIE displays a prompt listing the dependencies it found and asks whether to select them now. The prompt also includes a Do not check for dependencies again for this export checkbox. Selecting it asks you to confirm, then checks the Ignore Dependencies checkbox on the Export Configuration dialog so QIE stops checking for dependencies.
Note
When an exported object contains a script with a syntax error, the dependencies prompt lists that object in red as (Script contains errors) and reports how many scripts it could not verify. Dependencies referenced only from those scripts may be missing from the export. Fix the scripts and export again, or add the missing objects to the export by hand.
System Configuration
The System Configuration check box item contains all of the QIE setup configurations under the System Configuration navigation section of QIE. This includes user accounts, license groups and their relationships to licenses and zones.
Note
QIE login passwords are encrypted in the export file.
Licenses
The Licenses check box is only available while logged in as the default System Administrator user (Admin). This exports the licenses only. Licenses are encrypted and secured in the export file and can only be imported by entering the correct password for the default System Administrator user.
Export Sample Messages
Select this checkbox to include all sample messages associated with the channel in the export file. Selecting the option displays a pop-up window warning of the possible existence of Personal Health Information (PHI). Care should be taken when selecting this option especially if the configuration will be shared with others.
Note
When the option is selected to export sample messages all sample messages are encrypted in the export file.
Ignore Dependencies
Select this checkbox to stop QIE from automatically selecting the dependencies associated with the items being exported (see Dependency Selection). Selecting it displays a confirmation prompt warning that you will need to manually select any dependencies for the items being exported. This checkbox is also checked automatically when you select the Do not check for dependencies again for this export option on the dependencies prompt (without re-displaying the confirmation). Uncheck it to resume dependency checks. Selecting an item with unselected dependencies then displays the prompt again. Use this option only when you intend to manage the dependency selection yourself.
Import Configuration Dialog
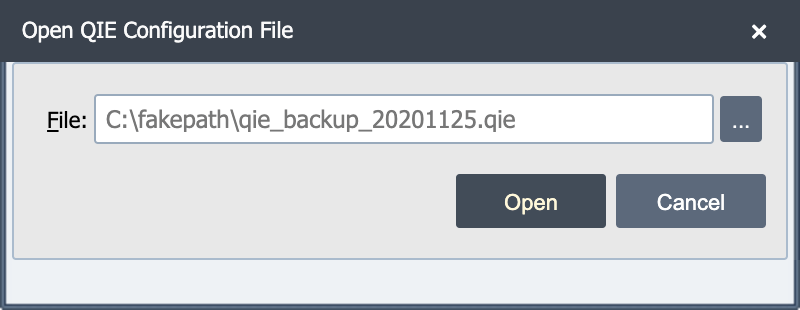
The Import Configuration Dialog is accessed by selecting Application -> Import Configuration from the main menu. Enter a full pathname to the configuration file or click the ellipses to search for a file. Select the Open button to display the Item Selection screen.
Note
This dialog only imports QIE configuration files. A Mirth Connect export cannot be imported here and fails with a message saying the file is not a valid QIE configuration. To convert one, use the Convert Mirth Configuration option on the same menu, which produces a QIE configuration that can then be imported.
Item Selection
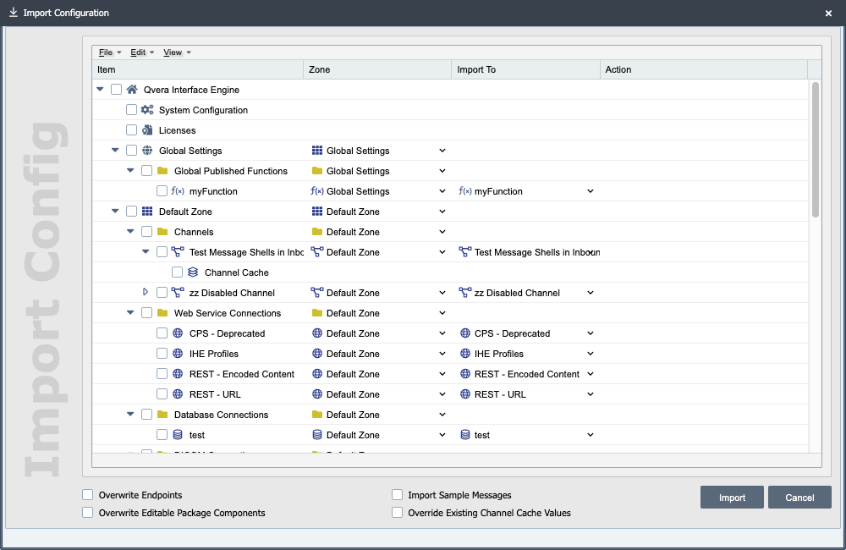
Selecting the root node (labeled Qvera Interface Engine) selects all configuration information across all Zones. Use the check boxes to select individual items to import.
Note
If an item selected for import already exists in the zone where the item is being imported, the existing item is updated (overwritten by the item being imported). Items that do not already exist are created. The only exception to this rule is the Channel Cache Variables. (See Override Existing Channel Cache Values for more information)
Changing Import Zone
Items can be imported to the same zone from which they were exported (the zone is created if it does not exist), or another zone can be selected from the drop-down list. If the zone is selected from the Zone or folder level (Channels, Web Service Connections, Database Connections etc.), all of the items in the folder are imported to the selected zone. If a different zone is selected next to an individual item, only that item's zone is changed.
Import To
When importing an item that already exists, QIE by default selects the existing item to be updated. QIE auto selects the existing item based on the item's unique id. The Import To drop-down allows selection of a different item to be updated. To create a new item rather than updating an existing one, enter the object name in the drop-down.
Name matching is case- and whitespace-insensitive
Zone object names must be unique within a zone, compared without regard to letter case or leading/trailing whitespace. If you enter a new name that differs from an existing item only by letter case or surrounding whitespace, the import is rejected with a duplicate-name error rather than silently overwriting that item. The error shows both the existing (database) name and the imported (configuration file) name, and identifies the difference. To overwrite the existing item instead, select it from the Import To drop-down, or enter its exact name. The drop-down preserves leading and trailing whitespace, so items whose names differ only by spacing can be told apart.
Action
This field displays whether the import updates an existing item, creates a new item, or other details to describe the import behavior.
Overwrite Endpoints
By default QIE does not overwrite the channel source and destination endpoint information (e.g. socket connection, SFTP, File Transfer, etc. settings). This allows for updates to a channel made in a test system to be exported and re-imported to a production system without overwriting the endpoint settings. If the option is selected to Overwrite Endpoints, these items are also imported and overwrite the existing settings.
Overwrite Editable Package Components
By default QIE does not overwrite the editable components of a package. This prevents the import from wiping out any custom changes. Select this checkbox if the editable components have not been customized or the customizations are no longer required.
Import Sample Messages
The Import Sample Messages check box allows a user to include the Sample Messages associated with the channels to be imported. Selecting the option displays a pop-up window warning of the possible existence of Personal Health Information (PHI). Care should be taken when selecting this option especially if the configuration came from an outside source.
Note
Sample messages contained in the export configuration file are encrypted.
Override Existing Channel Cache Values
By default, QIE does not overwrite the values for channel cache variables, but it does insert missing items and update the descriptions. This allows for updates to a channel made in a test system to be exported and re-imported to a production system without overwriting the values for channel cache variables. If the option is selected to Override Existing Channel Cache Values, the values are also updated.
Channel Cache
The only item in the import tree below the channel is Channel Cache. This can be used to allow only the channel cache variables to be updated. This feature is useful for updating channel cache variables without changing or updating any other part of channel configuration.
Convert Mirth Configuration Dialog
The Convert Mirth Configuration Dialog is accessed by selecting Application -> Convert Mirth Configuration from the main menu. It converts a Mirth Connect channel export into a QIE configuration that can then be imported.
Conversion runs on Qvera's conversion service rather than on your engine, so a conversion continues even if you close the dialog. Reopen it at any time to check progress.
Conversion Jobs
Each row in the dialog is one conversion job. The leading indicator shows the job's state at a glance:
| Indicator | Meaning |
|---|---|
| Grey dot | The file has been uploaded but not yet submitted for conversion |
| Grey spinner | The conversion is running |
| Green check | The conversion completed |
| Red triangle | The conversion failed |
| Yellow triangle | The conversion was cancelled |
The row also shows the file name and description, the status, and the percentage complete. The percentage advances through the phases of the conversion: reading the Mirth file, building channels and nodes, converting the JavaScript from the original channels, then assembling the final configuration.
Job Actions
Select the button in a job's Action column to see the actions available for that job:
| Action | Available when | Effect |
|---|---|---|
| Submit | The file is uploaded but not yet converted | Sends the file to the conversion service |
| Cancel | The conversion is running | Stops the conversion |
| Import | The conversion completed | Opens the converted configuration in the Import Configuration Dialog |
| Download | The conversion completed | Downloads the converted configuration as a QIE configuration file |
| Open Report | The job has run, whether it succeeded or not | Opens a report describing how the conversion went |
| Delete | Always | Removes the job from the list. This does not delete anything already imported |
Conversion Report
The report summarizes one conversion. It opens in a read-only viewer, where the text can be selected and copied, and the Download button saves it as a text file to open elsewhere or send on.
For a conversion that completed, it lists what was created (zones, channels, nodes and connections), followed by the conversion notes for each channel. Those notes identify the parts of the original Mirth channel that did not convert, or that converted in a way worth checking, and where each one is. The same notes appear on each channel's About tab after the configuration is imported.
For a conversion that failed, the report gives whatever the conversion service reported about the failure, and explains what the percentage it stopped at means. For example, it says whether the Mirth file had been read successfully before the failure occurred.
Note
Conversions can fail for temporary reasons. If a conversion fails, wait a few minutes and try it again. If it continues to fail, download the report and send it to support@qvera.com along with the Mirth configuration file being converted.