Practice Exercise 1
Note
These exercises assume that the QIE server has been installed and configured and that you have been given a QIE username and password with the appropriate privileges to create and modify QIE channel (interface) configurations. Please refer to the QIE installation guide for instructions on how to complete these steps if they have not already been completed.
Note
These exercises also assume that the user has completed the QIE Tutorial and is familiar with basic channel setup.
In the real world, when an interface need arises, the requirements and other information are described to the QIE developer. These requirements and information are referred to as a problem statement. From this problem statement the QIE developer should be able to start coding and testing an interface without having to think about the JavaScript syntax. The QIE Code Wizard and/or Auto Code completion helps the developer focus on the business logic of the interface and not the JavaScript code or syntax. The AI Companion takes this a step further. Paste the problem statement directly into the chat and it drafts the JavaScript for you, or review code you have already written against the requirements. Working through the exercises by hand first is still worthwhile: it builds the intuition you need to spot when a generated answer is off.
The following exercises follow this same pattern and help the QIE developer to learn the process of developing an interface while at the same time applying the JavaScript knowledge learned in this manual.
Note
Do not forget to pay attention to the QIE syntax validation tool in the lower left hand corner of the code window as you complete the exercises.
Exercise 1 Problem Statement
Create an ADT interface from the EHR system to an in-house imaging system. At this point there are 3 changes that need to be made to the incoming message:
-
Reformat the patient's date of birth to the HL7 Date/Time standard format of a four-digit year two-digit month and two-digit day.
-
Reformat the patient's gender abbreviation to the whole word of Male, Female or Unknown.
-
Copy the timestamp from MSH-7 to EVN-2 if EVN-2 does not have a value.
This exercise uses the following sample ADT messages. These messages can be saved as a sample messages in the channel. This allows you to lookup node paths (e.g. EVN-2) and to test the messages in the Test window.
Sample Message with EVN date
MSH|^~\&|EHR|Test^E IM|Imaging|E IM|20120925173019||ADT^A04|16642134|P|2.3.1|||NE|NE
EVN|A04| 20120925174018
PID|1||661||Chamberlain^Lisa^S||1961-03-01|F||B|6790 Oak St^^Plano^IL^60448^USA||^^^lchamb@mbc.com|(214) 669-0123 [123]||M|||237-12-9812|||N
Sample Message w/o EVN date
MSH|^~\&|EHR|Test^E IM|Imaging|E IM|20120925173019||ADT^A04|16642134|P|2.3.1|||NE|NE
EVN|A04|
PID|1||661||Chamberlain^Lisa^S||1961-03-01|F||B|6790 Oak St^^Plano^IL^60448^USA||^^^lchamb@mbc.com|(214) 669-0123 [123]||M|||237-12-9812|||N
Note
You can download the Sample Channel with the Sample Messages already loaded.
STOP HERE! Before preceding with the step by step exercise instructions below try to perform the exercise with just the explanation given above. Do not forget to use the "QIE Code Wizard" to help with your code syntax.
Step 1: Create a Basic Channel
In the Default Zone, create a new channel called "EHR >> to Imaging (ADT)".
Select HL7 as the source message format, and File as the source. Set the source file path to C:\HL7\In\.hd.
Load the two sample messages above as Sample Messages.
Set the destination node to File with a path of C:\HL7\Out\.hd.
Note
Create a new folder on the C: drive of the Qvera server called "HL7" and under that folder two other folders called "In" and " Out".
Step 2: Create a custom mapping for the date and time of birth
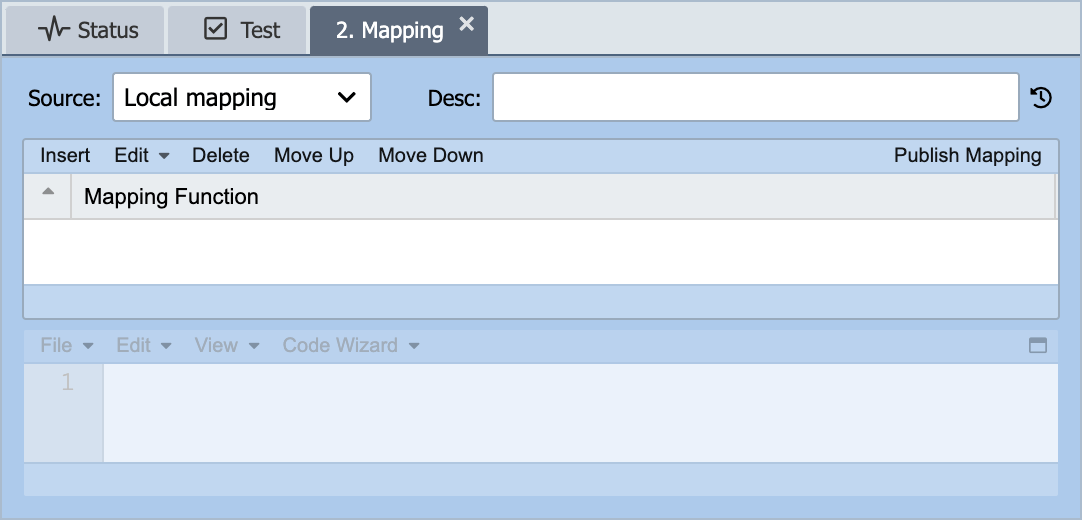
Select the mapping node from the graphical display of the channel. Click Insert. Change the Function type to Custom and remove the current default statement and set the Description to 'Reformat Date of Birth'.
From the problem statement the first change is to reformat the patient's date of birth to the standard HL7 format. To accomplish this; retrieve the date from the source message, save it to a variable, reformat it using a QIE date/time function and finally place it in the outbound message.
- Select the Code Wizard | Source | Get Node function. This inserts the following into the code window:
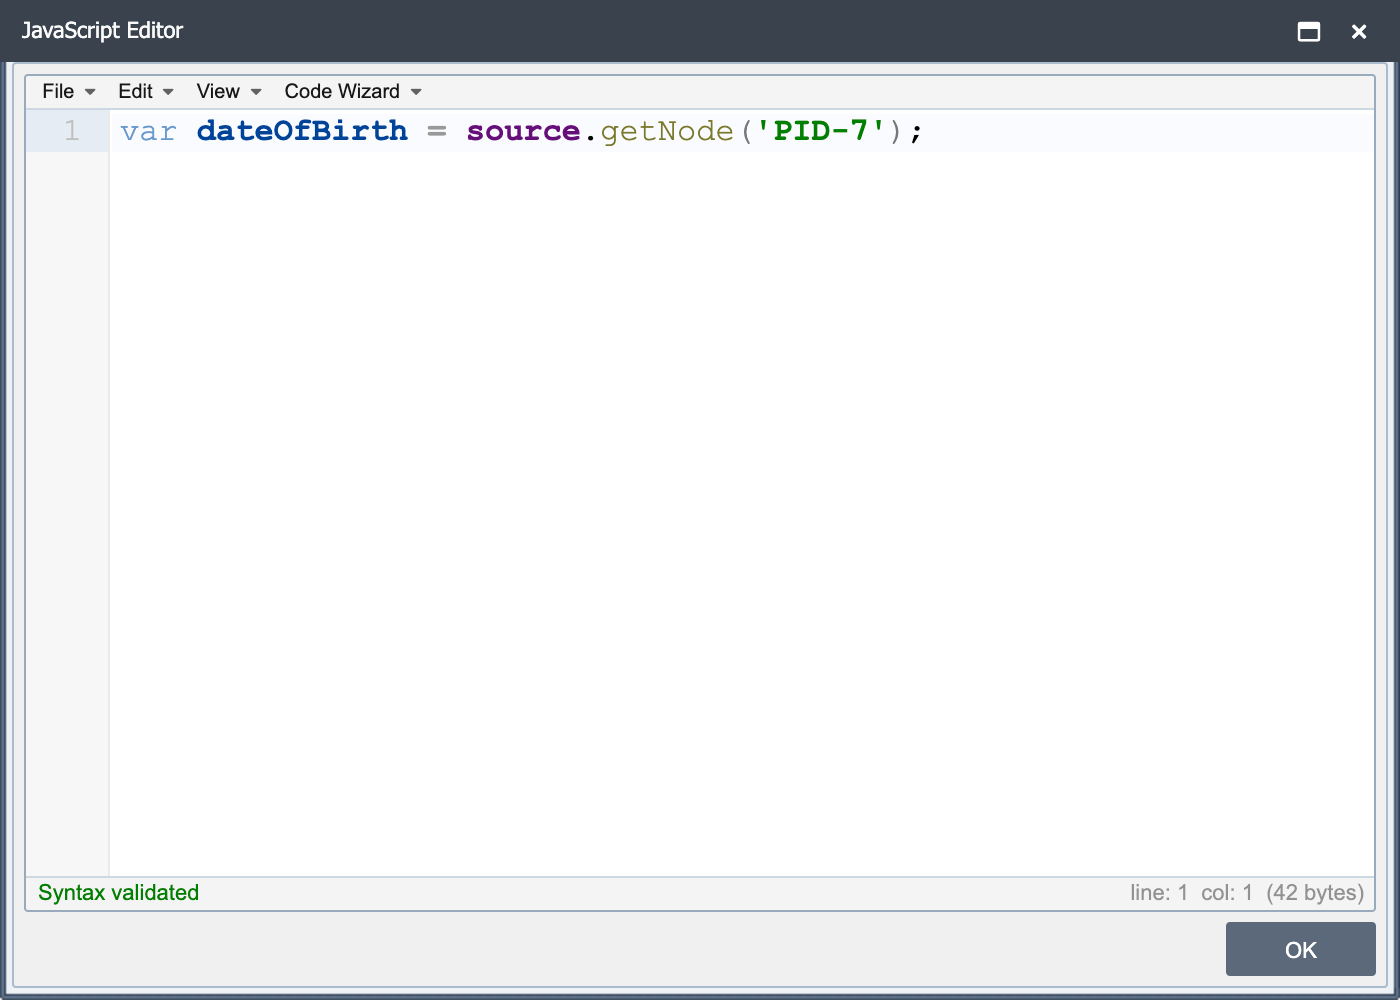
- The source.getNode template shows that nodePath and instance are the available parameters for this function. To specify the node path location for the date of birth from the source message delete the nodePath prompt and enter 'PID-7', Alternatively you can lookup the node path from the sample message using the "View" menu option and select "Node Path Lookup". Next, input which instance to pull the date of birth from. Since an HL7 message can have only one PID segment there are two options. The first is to enter a 1, indicating the first instance to pull the value from. The second is to look at the Code Wizard description of the source.getNode() function, which shows that the instance parameter is optional, so the parameter can be removed along with the comma that follows the first parameter. Your code should now look like this.
Note
You can think of the node path ('PID-7') as a predefined variable for the patient's date of birth. In fact, when processing an HL7 message every node path or HL7 field is predefined and can be accessed from the source message or set within the outbound message by the HL7 Node Path. See the reference guide for more information on HPATHs.
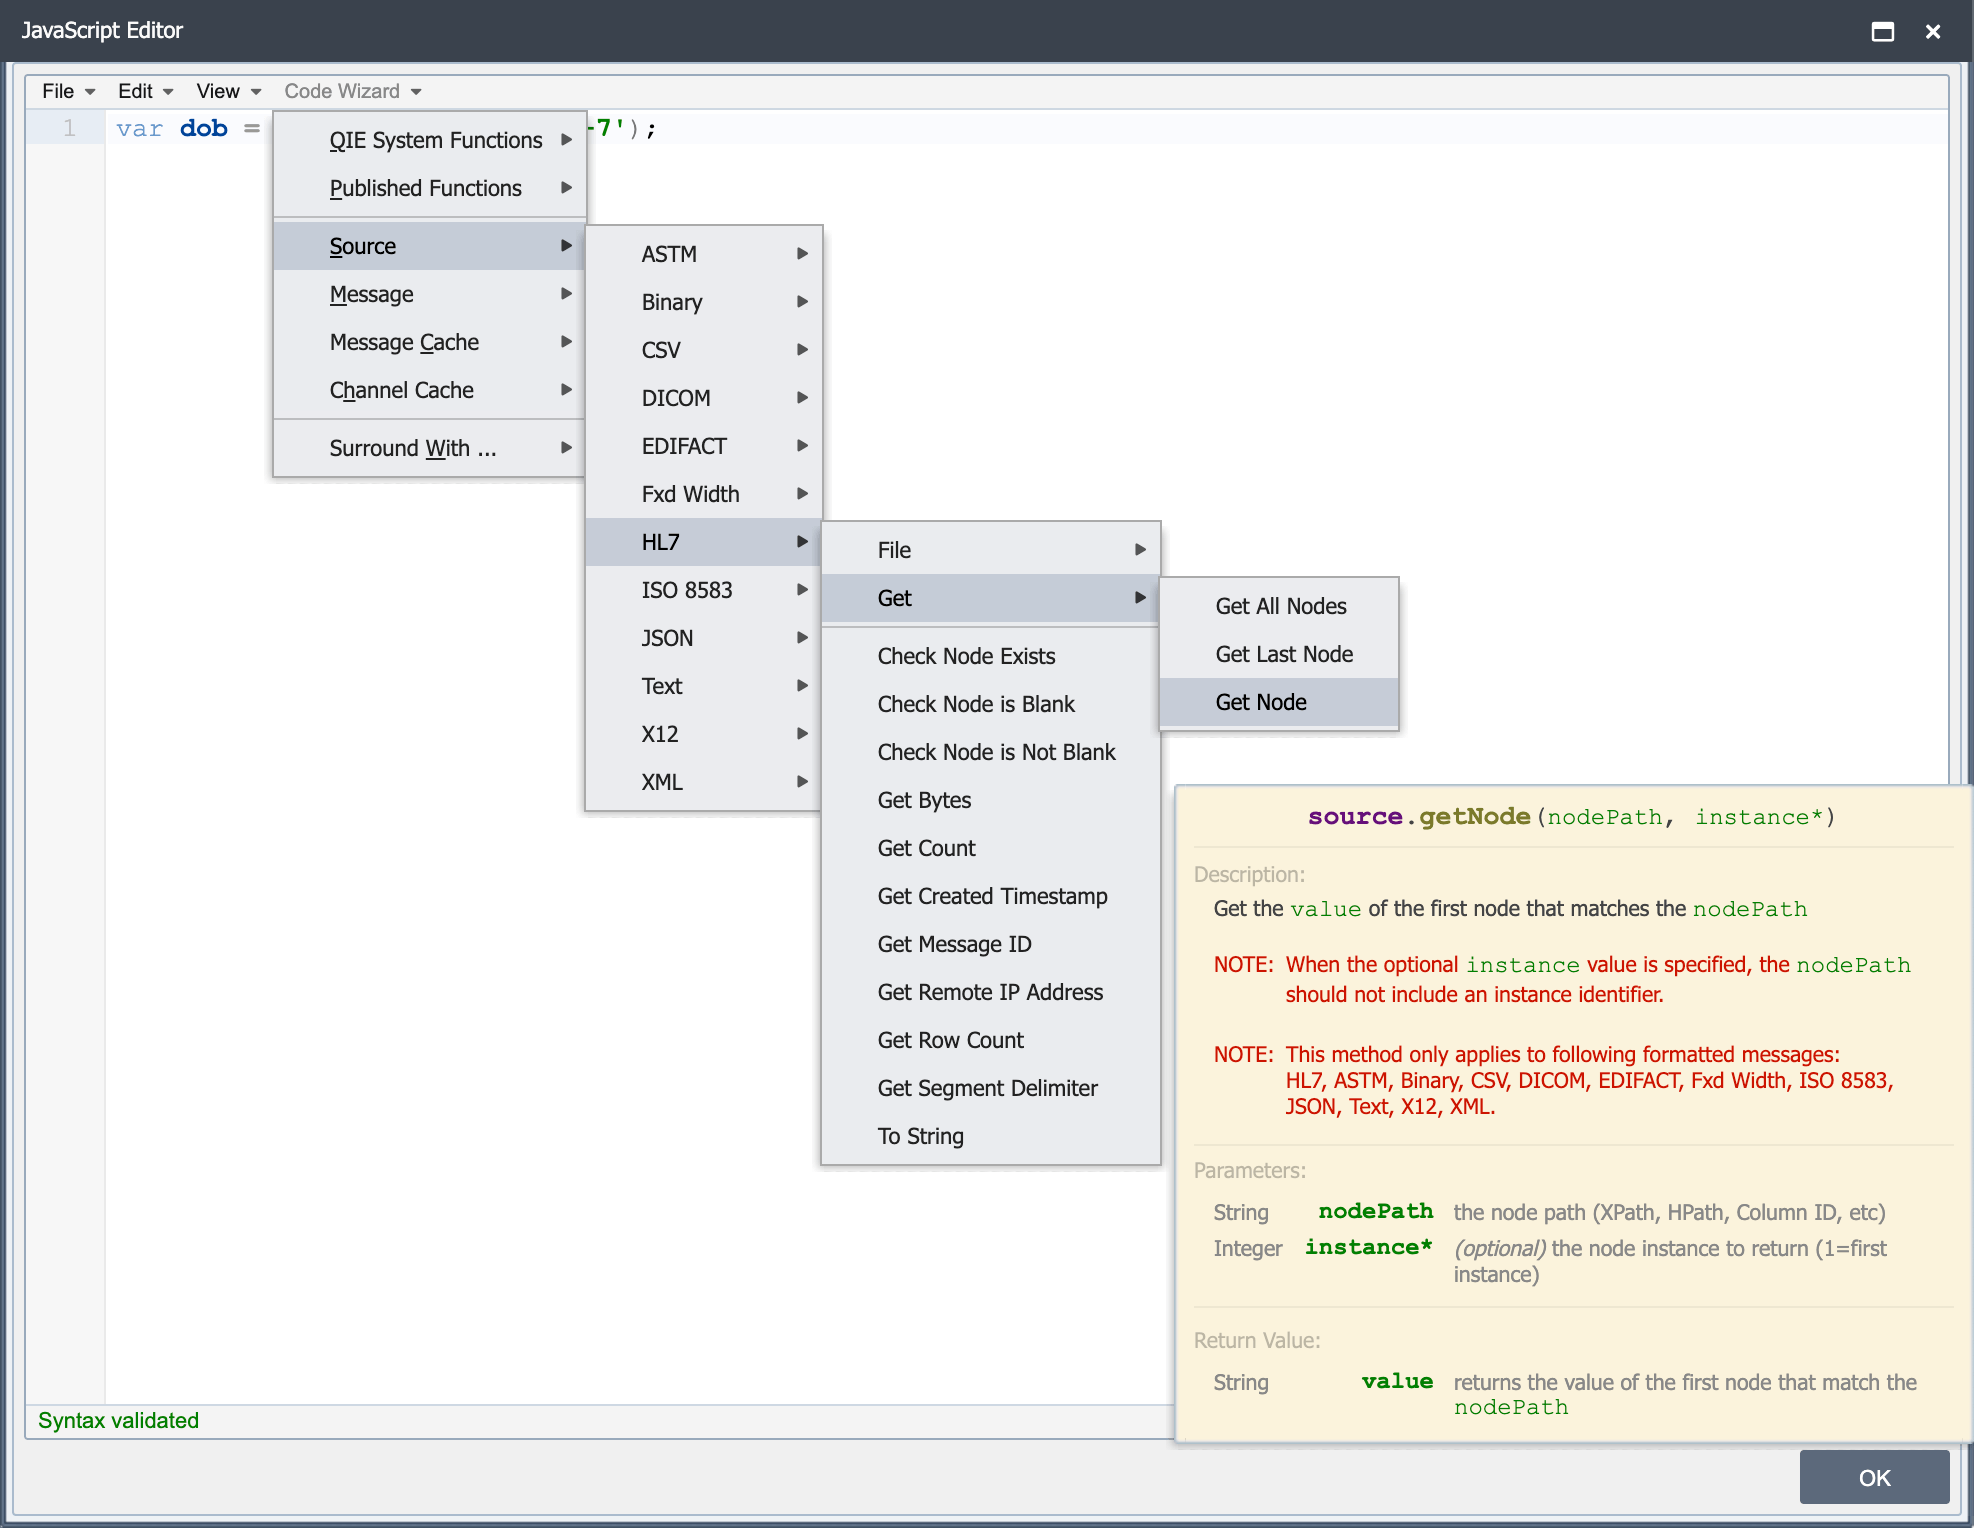
- The source.getNode() function returns the date of birth as a "String" value. This value needs to be stored in a variable. This is done by declaring a variable and setting it equal to the value returned by the function.
Your code should now look like this:
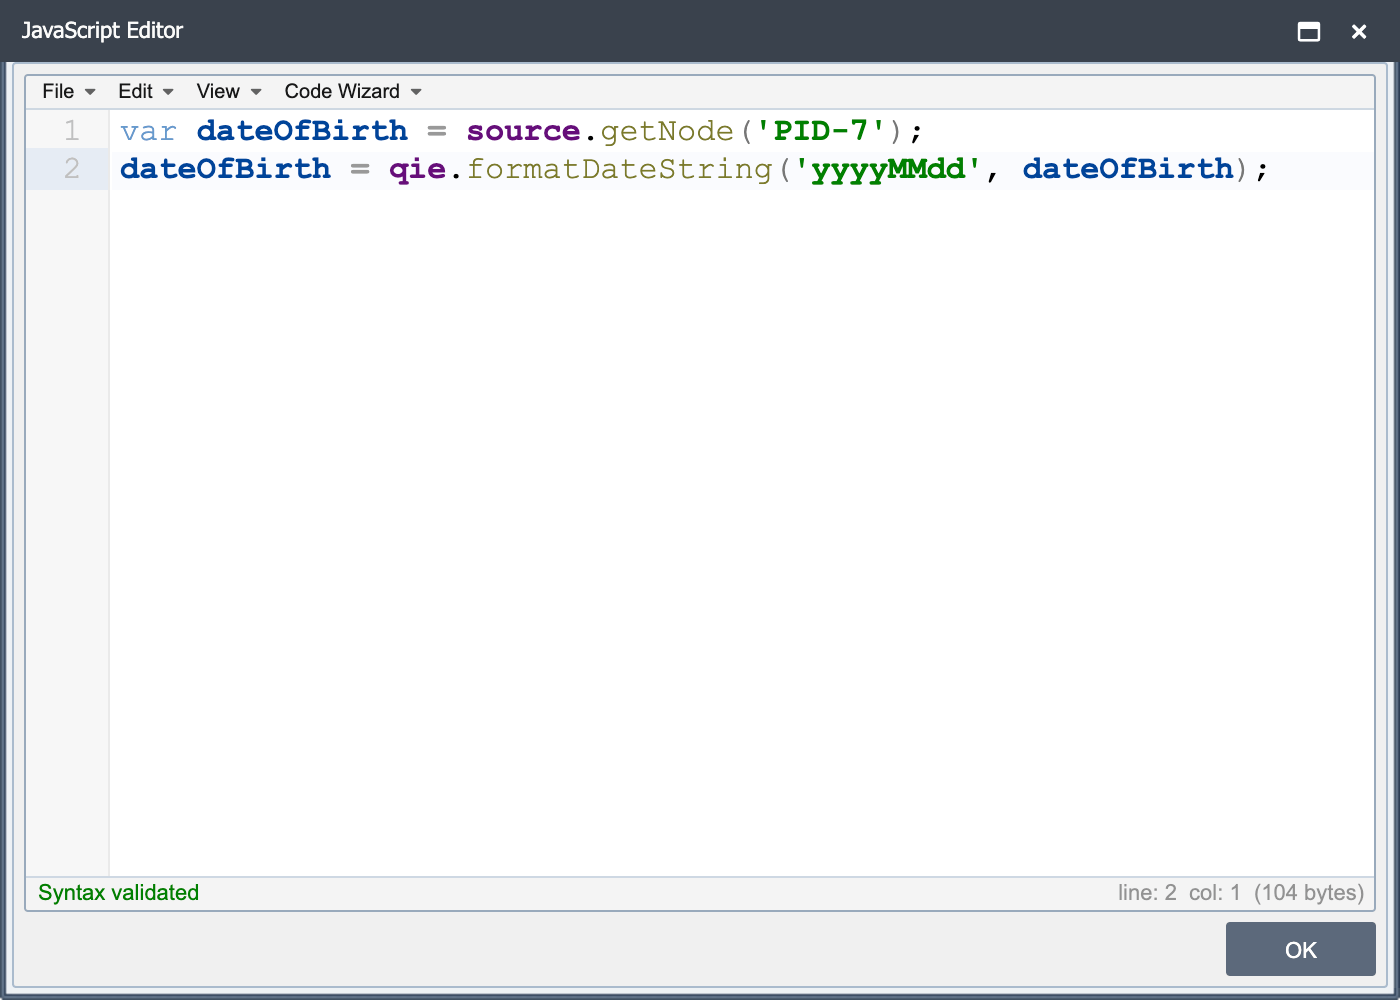
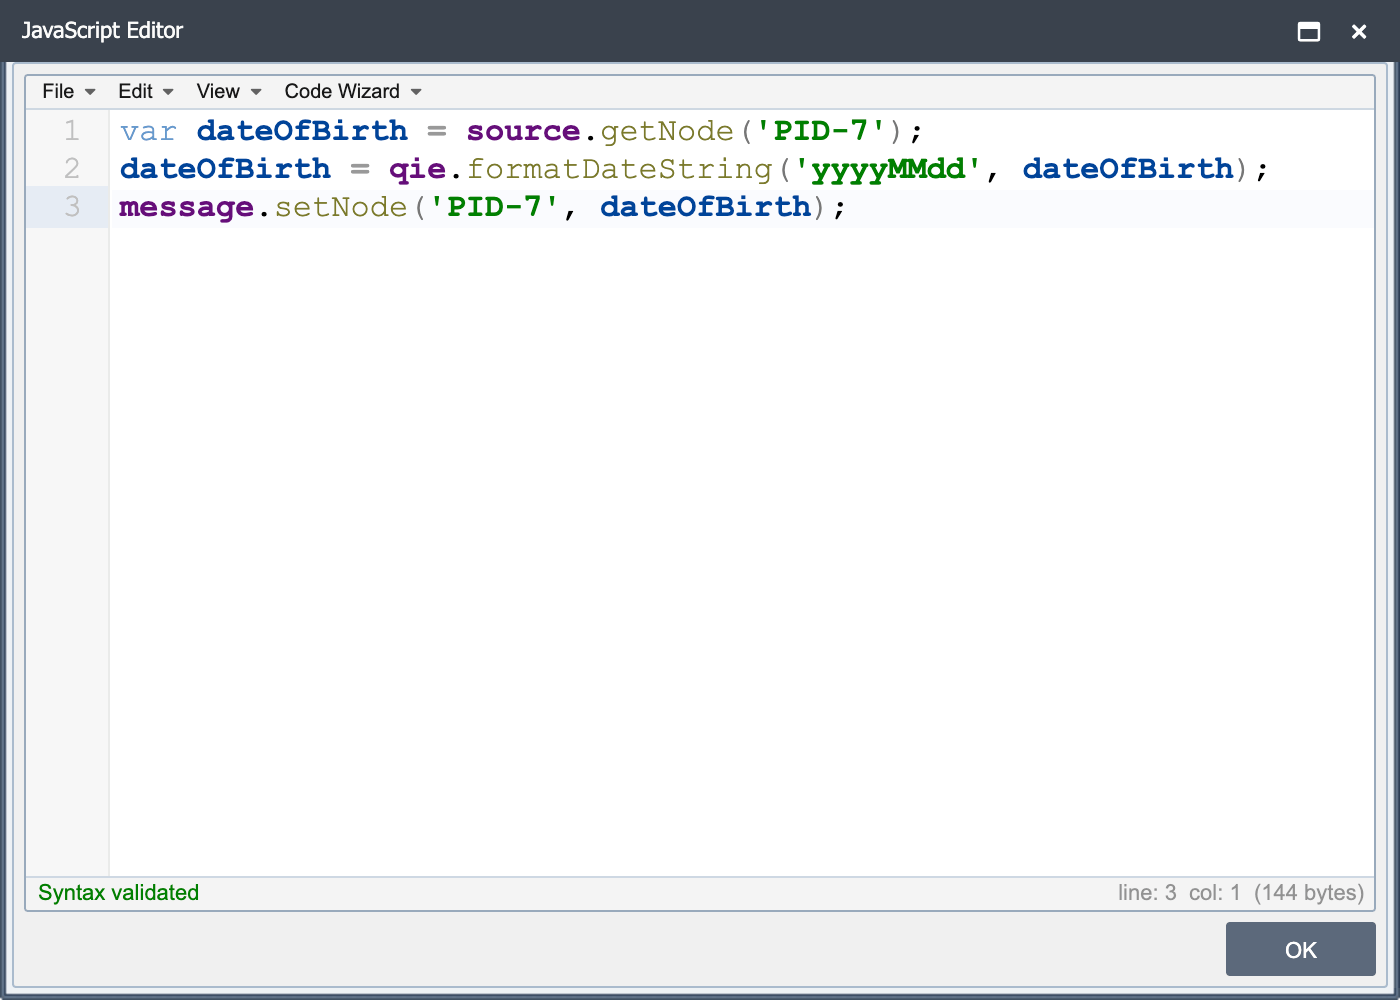
- Next the date and time of birth must be re-formatted to the HL7 date and time format of yyyyMMdd and placed in the new message. Place your cursor on the next line following the first statement and then select Code Wizard | QIE System Function | Date | Format Date function. This function has two parameters of 'format' and 'date'. Replace the 'date' parameter with the variable that holds the patient's date of birth, and replace the 'format' parameter with the desired date pattern of 'yyyyMMdd'. For more information about the date pattern strings see Date Functions in Scripts. The return value from the qie.formatDate() function should be placed back into the same dateOfBirth variable. Do this by adding dateOfBirth = in front of the function. Notice that it was not necessary to re-declare the dateOfBirth variable with the var key word. This is because it has already been declared and is just being re-used to store the newly formatted date of birth.
-
The last step is to place the reformatted date of birth back into the outbound message. To do this place the cursor on the third line and select Code Wizard | Message | Set Node function. This function has four parameters; two are required and two are optional. To insert the re-formatted date of birth back into the message, replace the 'nodePath' prompt with the HL7 Node Path of 'PID-7'. Next, tell the function which value to use by replacing the 'value' prompt with the dateOfBirth variable. Since the instance and forceNode parmaeters are optional and are not needed in this scenario they can be deleted. Your complete code should look like this.
-
Now test the code in the Test Window. The expected output should have reformatted the original date of birth from 1961-03-01 to 19610301.
Congratulations! You have just coded JavaScript using QIE without having to focus on the JavaScript syntax as much as the business logic. This is a good thing☺
Step 3: Modify the gender value
Next, from the problem statement, modify the patient's gender value from an abbreviated format to a spelled-out value. To accomplish this a cross reference table can be created to modify the values.
Create the Table
-
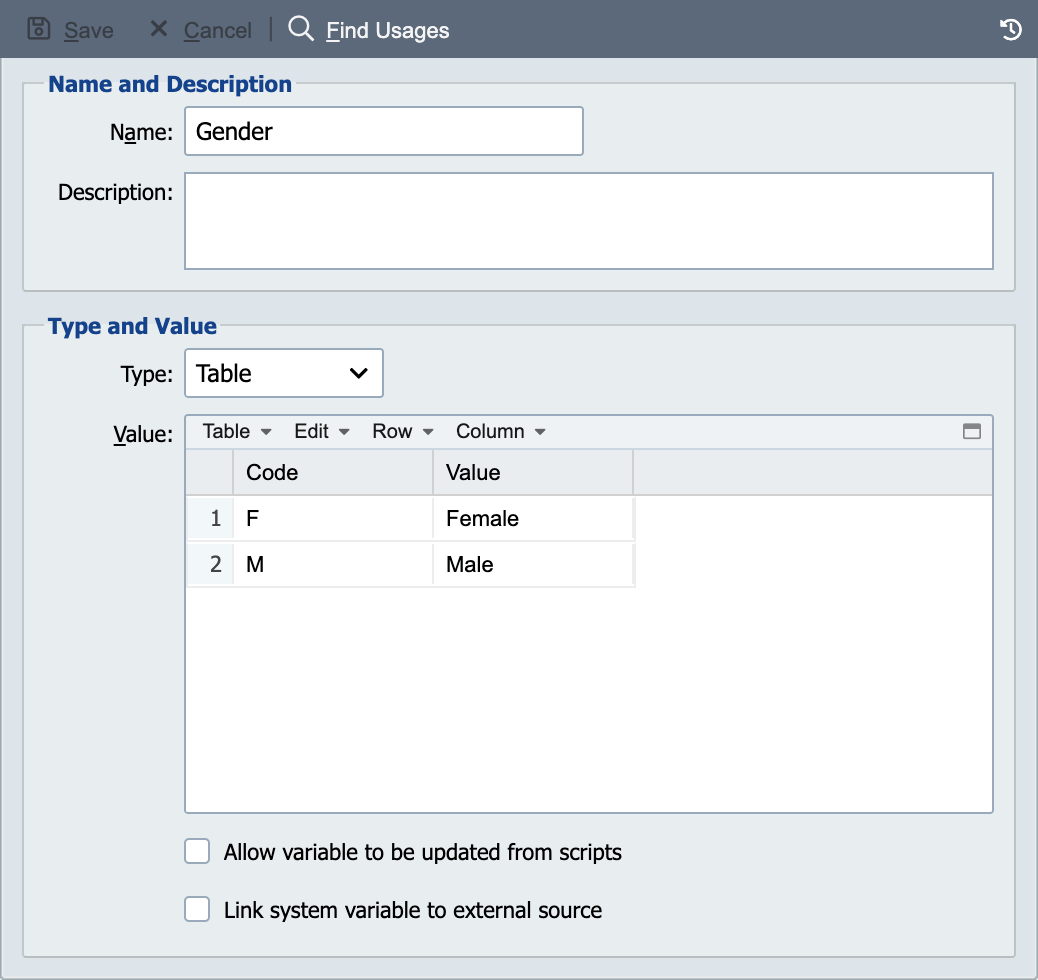
Navigate to the System Variables on the left-hand side navigation menu and then on the content page click on 'New' to create a new table.
-
Name the table 'Gender' and select 'Table' from the type drop down menu 'Table'. Next tab off the type field to begin entering the first value in the table. By default QIE creates a table template with only two columns, however, clicking on the 'Column' menu allows adding additional columns as needed.
-
Place the cursor in any value within column 1 and select 'Column' from the menu and choose 'Rename Column' and call column 1 'Code'. Repeat these steps and rename column 2 to 'Value'.
-
Enter 2 rows of data; 1 row with F in the first column and Female in the 2nd column and a second row with M and Male.
-
Save your newly created cross reference table.
Use the Table in a Mapping Node
-
Return to the channel and click on Insert from the Mapping menu to insert a second mapping function.
-
Select Custom Script from the function drop down menu and change the Description to 'Cross Reference Value'.
-
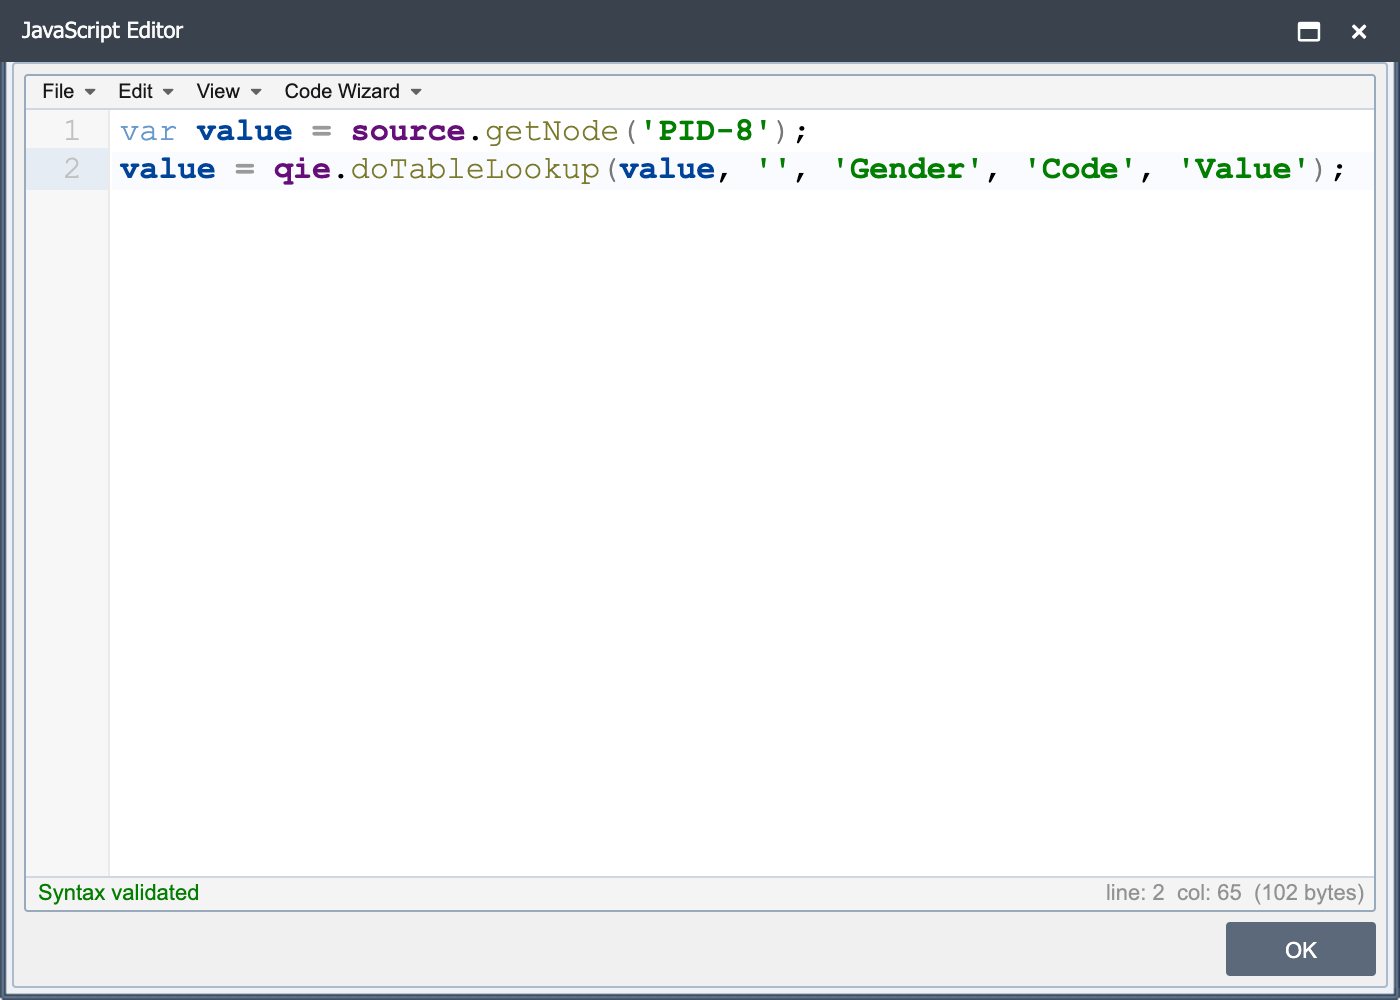
Set the variable 'value' equal to source node 'PID-8'
-
Place your cursor on line two and then select Code Wizard | QIE System Functions | System Variables | Do Table Lookup. Then change the prompts as follows. Be sure to add value = at the front of the line to capture the table lookup result back into the variable.
| Parameter | Value |
|---|---|
| value | Can be left as value or changes to match the variable name on line 1. |
| notFoundValue | Change to empty string '' for a default value to use when no match is found in the cross-reference table. |
| tableName | Change this to the name of the table defined in system variables (Gender). |
| sourceColumn | Change to the first column name used when setting up the table (Code). |
| targetColumn | Change to the second column name used when setting up the table (Value). |
```javascript
var value = source.getNode('PID-8');
value = qie.doTableLookup(value, 'Unknown', 'Gender', 'Code',
'Value');
```
!!! note
Notice in the code sample above that the qie.doTableLookup() statement across two lines following a comma to help with readability and to keep the code within the code window.

-
On the next line take the resulting value from the cross-reference table and put the new value back into the outbound message. To do this select Code Wizard | Message | Set Node, and change the node path to 'PID-8', and change the value prompt from 'value' to value. Making this change passes the contents of the value variable to the message.setNode() function rather than passing the literal string "value".
-
Now test the code in the Test Window. The expected output should have reformatted the original gender value from F to Female.
Congratulations! You have just coded more JavaScript using QIE without having to focus on the JavaScript syntax as much as the business logic.
Step 4: Check for EVN-2 Timestamp
Finally, from the problem statement the EVN-2 may be blank and if it is blank, the timestamp needs to be copied from MSH-7.
-
Click insert to create a third mapping function for the final requirement. Set it to a Custom function type and set the Description to 'Set EVN-2 if Blank'.
-
The next step is divided into three steps. The first is to get the MSH-7 value, the second to check if it is empty or null, and the third to test the code.
-
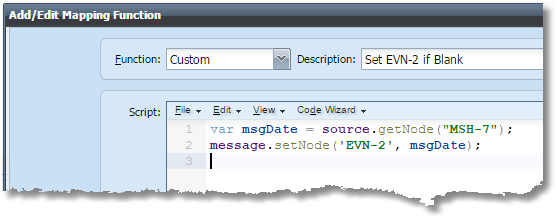
To get the MSH-7 value replace the node path with 'MSH-7'. Change the variable name to msgDate. Place your cursor on line 2 and click Code Wizard | Message | Set Node and replace the node path with 'EVN-2', and replace 'value' with msgDate.
-
Now highlight both lines of code and select Code Wizard | Surround With | if to surround your code with an if statement. To add a condition for your if statement to evaluate, start out by deleting the text between the parentheses 'false/*todo*'. With your cursor still between the parenthesis click Code Wizard | QIE System Functions | String Utils | Is Blank. Then delete the 'inputString' (including the single quotes) and click Code Wizard | Source | Get Node. Replace the node path with 'EVN-2' and remove the instance variable. The if statement now check to make sure that EVN-2 is blank before setting the value from MSH-7.
-
Now test the code in the Test Window. Be sure to test this code with 2 sample messages, one with a value in EVN-2 and another with EVN-2 blank. The expected output should have copied MSH-7 into EVN-2 when EVN-2 is null.
-
Congratulations! You have just coded even more JavaScript using QIE without having to focus on the JavaScript syntax as much as the business logic.
This completes the tutorial exercise. Hopefully, this has been a helpful way to start to understand how to use JavaScript in QIE by leveraging the tools that the interface engine provides. Happy coding!