Installing QIE on Linux/Mac
The QIE war zip file contains everything required to install QIE on a Linux or Mac OS server.
Note
Contact Qvera support for information on downloading the latest QIE war zip.
Linux Installation (Using systemd on Ubuntu 16.04 or later)
-
Create the required directory:
-
Extract the zip file to the new directory(/java/qie).
-
Copy '/java/qie/linux_install/qie.systemd.service.dist' to '/etc/systemd/system/qie.service'.
-
Grant permissions(rwxrwxrw):
-
Create a symbolic link. This makes it easier to find the service definition file if you need to configure QIE startup options.
-
Register the QIE service:
-
Enable the QIE service to autostart on boot:
OPTIONAL Use this command to disable autostart:
-
Create the log folder:
Starting and Stopping QIE service from a Linux Command Prompt
-
Start Command:
-
Stop Command:
Order QIE after a locally installed database
When the QIE database (MariaDB, MySQL, or MSSQL) is installed on the same host as QIE, both services start in parallel at boot and QIE can lose the race. The JDBC connection fails before the database is accepting connections. Tell systemd to sequence them by adding After= to QIE's [Unit] block. Edit /etc/systemd/system/qie.service:
Substitute the actual unit name of your database service (mysql.service, mysqld.service, mssql-server.service, etc.). After= sequences the start order; Requires= also brings the database up if QIE is started manually. Reload systemd and restart the service:
For the Windows-service equivalent, see Troubleshooting New and Existing Installs.
Running QIE as a non-root user
By default the QIE systemd service runs as root. To run QIE under a dedicated unprivileged account, create the account, give it ownership of the QIE install directory, and set User= / Group= on the service unit.
-
Create the
qieuser and group: -
Give the account ownership of the QIE directory:
-
Edit
/etc/systemd/system/qie.serviceand addUser=andGroup=under the[Service]section: -
Reload the unit file and restart the service:
Confirm the service is running under the new account with
systemctl status qie(the line starting with Main PID: shows the running user).
Updating qieLauncher
qieLauncher is the small service wrapper that starts, monitors, and auto-updates the QIE engine. Because it is the mechanism that applies updates to QIE, it cannot update itself. Existing systems only receive a newer qieLauncher when it is refreshed manually. Older qieLauncher builds that used Java RMI to communicate with the engine no longer work on Java 24 or later, so a launcher refresh is required before upgrading the JRE past 21.
To refresh qieLauncher on Linux or Mac:
-
Stop the QIE service.
-
Extract the new
qieLauncher.jarfrom the latest QIE war zip and copy it over the existing file (typically/java/qie/qieLauncher.jar). -
Restart the QIE service.
QIE writes the launcher version to qieLauncher.log at every start, so you can confirm the refresh took by checking that log for the expected QieLauncher version: yyyyMMdd line.
Mac OS Installation
The name of the zip file contains the QIE version and build number (QIEVVVV_BBBB_war.zip). For example, if the zip file is QIE3044_8884_war.zip, the version is 3044 and the build number is 8884.
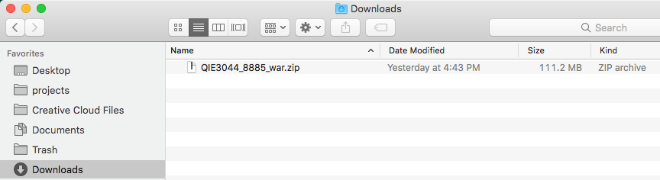
- Use Finder to navigate to the directory where the zip file was downloaded and double-click the zip file to extract.
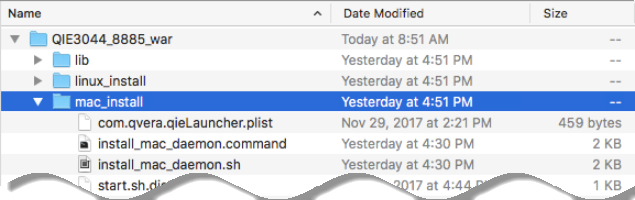
- Navigate to the mac_install subdirectory. Hold down the
<Ctrl>key and click on 'install_mac_daemon.command'.
Note
If you do not hold down the <CTRL> key while clicking on the file it does not allow you to launch it.

- This displays a list of options. Select Open.
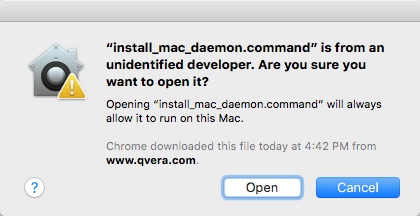
- Click Open again in the dialog box.
-
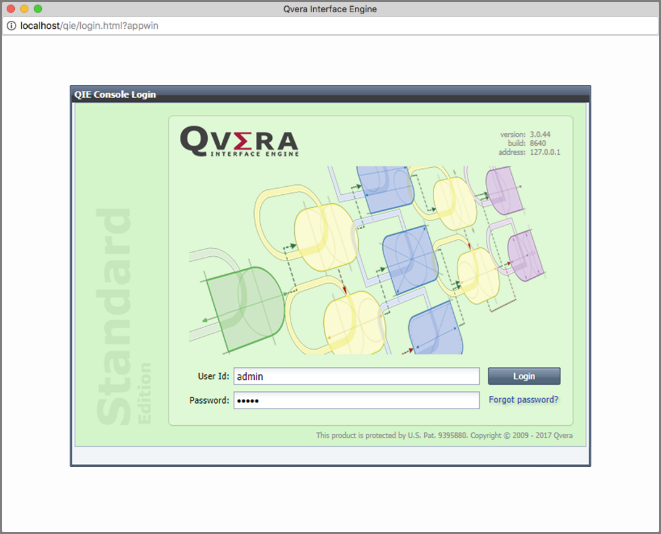
This opens the Terminal app and installs QIE. It requests your Mac user password to continue. When the install is complete, the browser opens and populates the user name and password with the default username/password of admin/admin. Click login or press
<Enter>to log into QIE. -
To access QIE after the installation, open the browser and enter localhost in the URL.
Starting and Stopping the QIE Service from the Mac Terminal Application
The QIE service must be started for access to the application. The installation process automatically starts the service. Use the commands below to manually start or stop the QIE service.
-
Start Command:
-
Stop Command: