Node Paths
A Node Path is a query string used to locate nodes or data elements in a message. Three sections below introduce node paths in general: Root Node Path defines the special path that selects the entire message for all message types; How Node Paths Resolve describes what a node path returns at runtime; and the Node Path Lookup Dialog provides an interactive tool for building and validating node paths against a sample message. After those, format-specific node path syntax is documented for each supported message format. See the table below.
| Message Format | Node Path Syntax Summary |
|---|---|
| ASTM - Node Path Syntax | Node path syntax for ASTM messages: {Segment ID}[{instance ID}]-{Field}.{component} |
| Binary - Node Path Syntax | Only the root node path (/) is supported. |
| CSV - Node Path Syntax | Node path syntax for CSV messages: Column ID [ Row Index ] |
| DB Result - Node Path Syntax | DB Query Results are formatted as CSV messages. A DB query result message always contains a header row populated with the column alias names returned by the database query. Refer to CSV - Node Path Syntax above for more information. |
| DICOM - Node Path Syntax | Node path syntax for DICOM messages: {Group},{Element} in hexadecimal (e.g. 0010,0010); ? may be used as a wildcard character (e.g. 00??,0100). |
| EDIFACT - Node Path Syntax | Node path syntax for EDIFACT messages: {Segment ID}[{instance ID}]-{Field}.{component} |
| Fixed Length - Node Path Syntax | Node path syntax for Fixed Length messages: Begin Index, Width [ Row Index ] |
| HL7 - Node Path Syntax (HPath) | Node path syntax for HL7 messages: {Segment ID}[{instance ID}]-{Field}.{component} |
| ISO 8583 - Node Path Syntax | Node path syntax for ISO 8583 messages: |
| JSON - Node Path Syntax | Node path syntax for JSON messages: forward-slash separated keys; array elements indexed as /key/[n]. |
| Plain Text - Node Path Syntax | Node path syntax for Plain Text messages: {start index}, {end index} |
| XML - Node Path Syntax (XPath) | Node path syntax for XML messages: conforms to standard XPath notation. |
| X12 - Node Path Syntax | Node path syntax for X12 messages: {Segment ID}[{instance ID}]-{Field}.{component} |
Root Node Path (/)
The Root Node Path, a single backslash (/), is used to select or to set the contents of the entire message. The root node path applies universally to all message formats.
How Node Paths Resolve
Node paths are how data is referenced in QIE. Every operation that touches a message (read, write, add, remove, count, validate, and many more) takes a node path as input. The Code Wizard groups these by category (Get, Set, Add, Remove, and others) and lists each function with its parameters and return type; the Node Path Lookup Dialog provides a UI for building and validating paths against a sample message.
This section shows three of the most common retrieval functions to illustrate how a node path resolves at runtime: getNode returns the first matching value, getLastNode returns the last matching value, and getAllNodes returns every match as an array. They behave the same way regardless of the underlying message format, and the node path syntax they accept is described in the format-specific sections that follow. The same first-match / all-match split appears in other paired QIE functions, for example, setNode writes the first match while setAllNodes writes every match, using the same node path syntax.
getNode(nodePath) returns the first match as a String, or an empty string if no node matches. A path that matches nothing never returns null. A path that matches a JSON null does: see JSON null Values.
getLastNode(nodePath) returns the last match as a String, or an empty string if no node matches.
getAllNodes(nodePath) returns every match as a String[], or an empty array if no node matches.
To target a specific occurrence with getNode, supply a 1-based instance number as a second argument. The instance may also be embedded directly in the path using bracket notation, the two forms are equivalent:
In practice the instance is often a variable populated from a loop. With the parameter form the variable is passed directly; with the bracket form it must be concatenated into the path string:
The bracket form is required when calling other QIE functions that take a nodePath parameter but do not accept a separate instance argument. The instance cannot be specified in both places at once; if it is, QIE throws a MessageModelException with the message: "The instance can only be specified in either the node path or the instance variable, not both."
A three-argument form, getNode(nodePath, instance, repetition), accepts a third argument used by some message formats: for HL7 and ASTM the third argument is a 1-based repetition number for the matched field; for DICOM it is the value representation (VR) string.
Example
Using the HL7 sample message shown on the HL7 - Node Path Syntax (HPath) page (which contains four OBX segments across two TXA groups):
source.getNode('OBX-5');         // 'Limb pain'
source.getNode('OBX-5', 2);      // 'http://svr/docs/Enc/54664_Limb_Pain.html'
source.getLastNode('OBX-5');     // 'http://svr/docs/Enc/54664_Chest_Pain.html'
source.getAllNodes('OBX-5');     // [ 'Limb pain', 'http://.../54664_Limb_Pain.html', 'Chest pain', 'http://.../54664_Chest_Pain.html' ]
Node Path Lookup Dialog
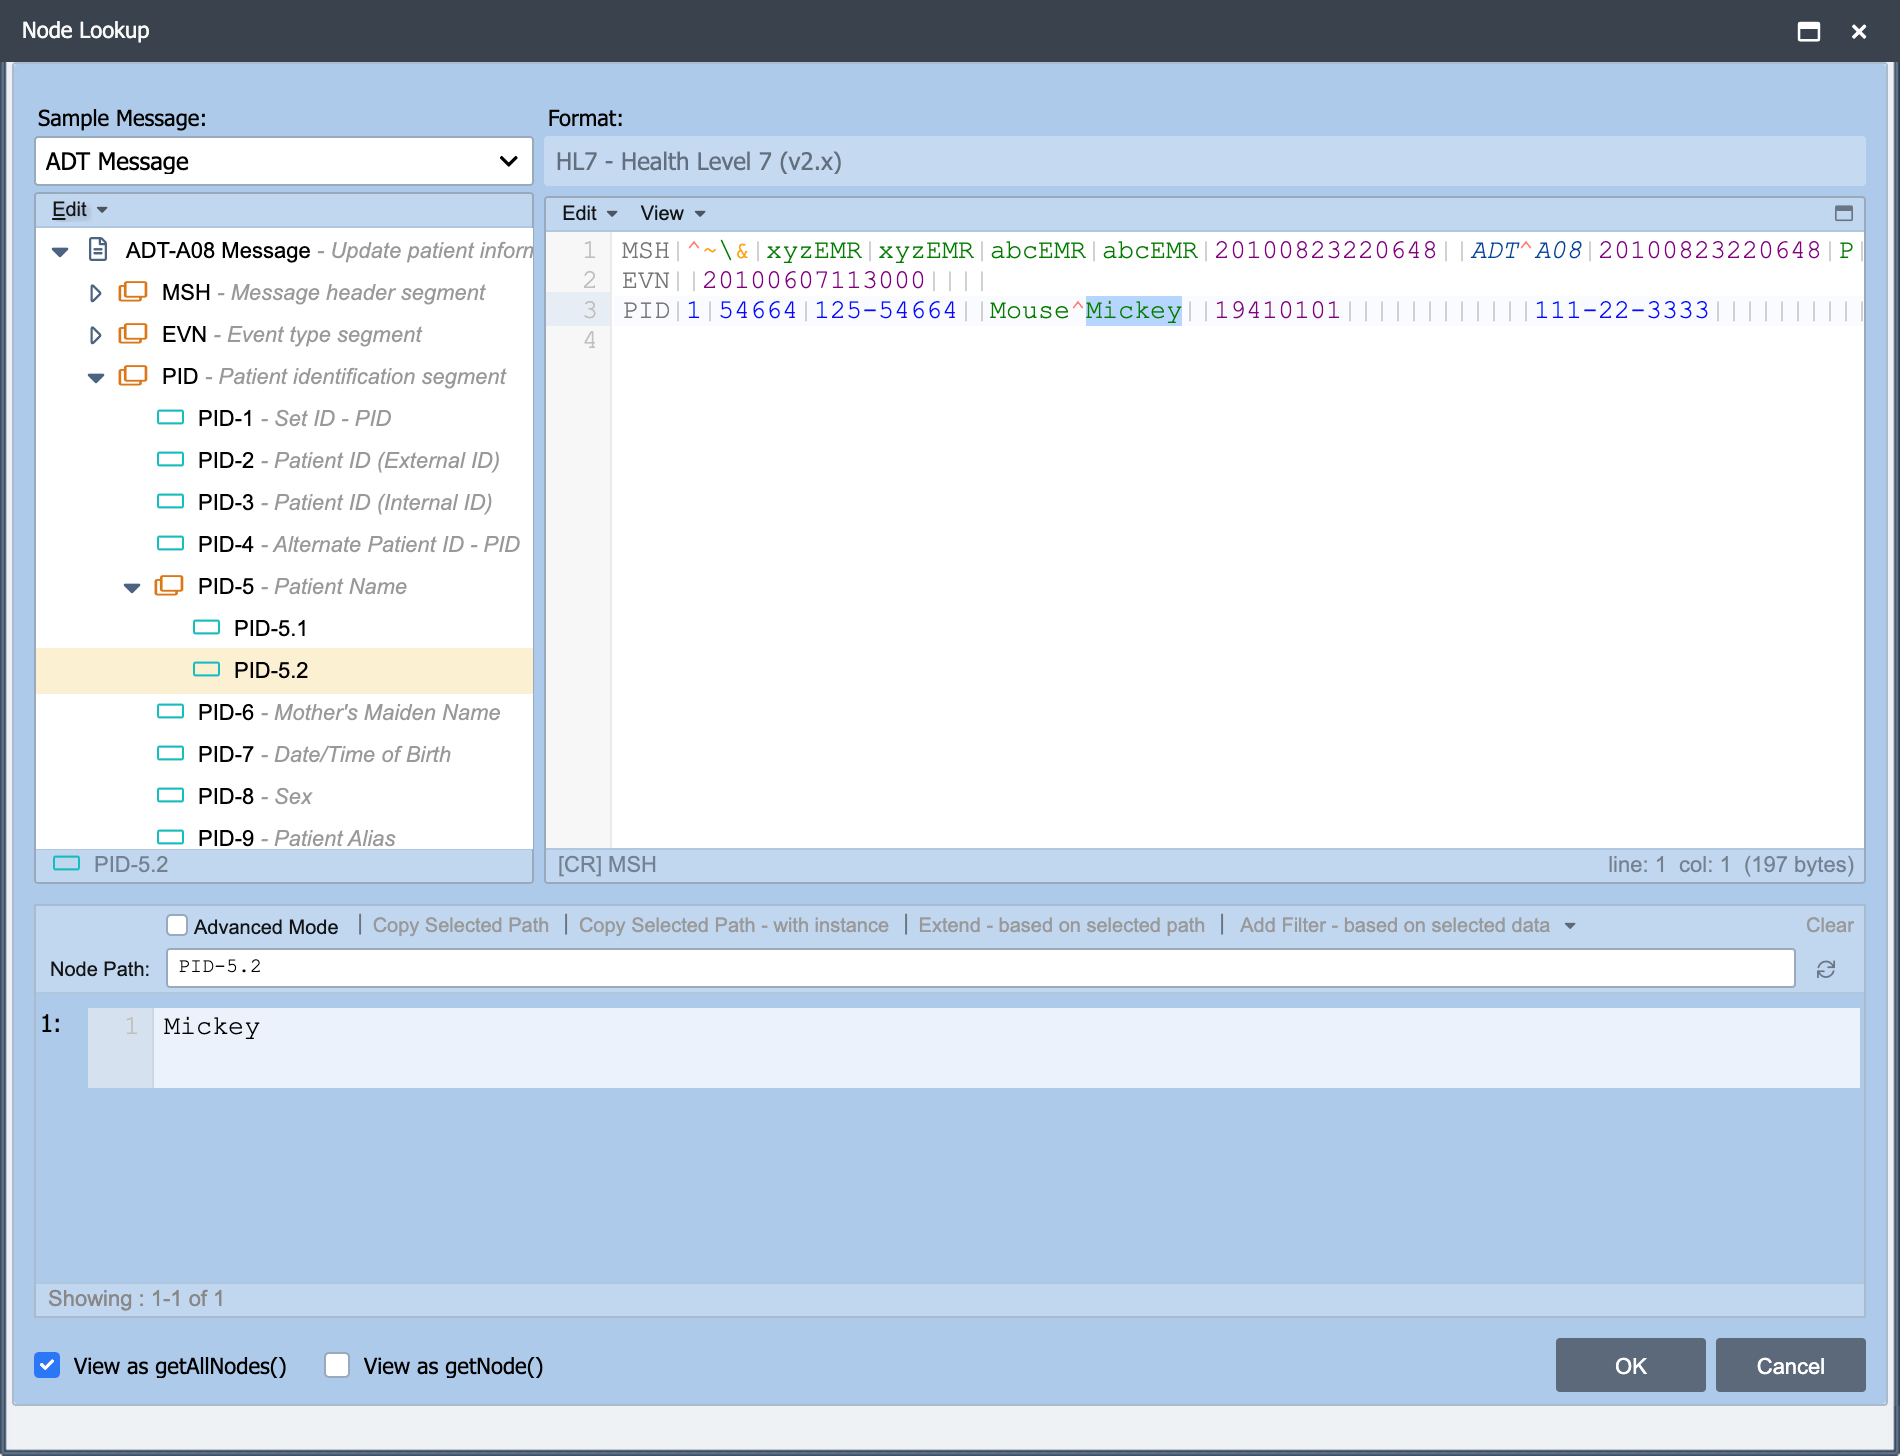
The Node Path Lookup Dialog provides a UI for building, validating, and copying node paths against a Sample Message. Open it from the View menu of the Script Editor or with the F2 hot key. The dialog requires at least one Sample Message to be saved on the Source Node; if none are saved, QIE displays an informational message and the dialog does not open.
A node path can be entered into the dialog in any of three ways:
- Selecting a node in the message model tree view on the left
- Clicking or positioning the cursor in the desired field of the Sample Message panel on the right
- Typing the path directly into the Node Path input
If a node path is already selected in the script when the dialog is opened, that path is pre-filled into the Node Path input and validated automatically.
Dialog Layout
- Sample Message drop-down: selects which of the channel's saved Sample Messages is displayed.
- Tree view (left): a parsed representation of the selected Sample Message.
- Sample Message panel (right): the raw Sample Message.
- Node Path input: the node path being validated.
- Result panel: displays the values returned when the node path is evaluated against the Sample Message, confirming what data is returned to the calling function.
View as getAllNodes() / View as getNode()
At the bottom of the dialog, two mutually exclusive checkboxes (View as getAllNodes() and View as getNode()) control how the result panel previews the data. View as getAllNodes() is the default; when the node path matches multiple values, the result panel allows scrolling through them and indicates the current position (for example, 1 of 2, 2 of 2). View as getNode() previews only the first match.
These toggles affect the preview only. The actual value returned at runtime is determined by the function that uses the node path in the script:
- If the calling function is
getNodeand the node path matches multiple values, only the first match is returned regardless of how the result panel was previewed. - If the calling function is
getAllNodes, every matching value is returned as aString[].
See How Node Paths Resolve for full behavior of these methods.
Advanced Mode
The Advanced Mode checkbox switches the dialog from browse-and-pick mode (the default) to manual-edit mode. When Advanced Mode is off, the Node Path field auto-populates from the tree view selection or cursor position in the Sample Message; when it is on, that auto-population is suspended and the user manually controls the path. Turning Advanced Mode on enables the following controls:
| Control | Description |
|---|---|
| Copy Selected Path | Copies the currently selected node path without an instance (e.g. /root/node) to the clipboard. |
| Copy Selected Path - with instance | Copies the currently selected node path with the instance (e.g. /root/node[2]) to the clipboard. A sub-menu also offers a "Copy as CDA path" variant for CDA documents. |
| Extend - based on selected path | Refines the current Node Path field using the active selection in the tree view or Sample Message panel. |
| Filter | A format-specific menu that inserts filter predicates into the Node Path field. For HL7 messages, the menu items are the operators and predicate functions documented under Filter Operators and Predicates: =, !=, >, <, a Functions submenu (contains, starts-with, ends-with, equals), and a Group submenu (Group Is, Group Not). XPath, JSON, and CSV messages have equivalent menus appropriate to their syntax. |
| Clear | Clears the Node Path field. |
Clicking OK inserts the current Node Path back into the script editor at the cursor location and closes the dialog.